LomoKino Power-Winder Tipster

44

In the interview of my friend and LomoKino filmmaker disdis he talks about his experience with the LomoKino. He mentioned he was curious about what kind of experiment I was going to do with a LomoKino. This tipster is dedicated to him.

Materials You'll Need

First, you will need the following items:

A. Tools
B. Strong glue ('araldite' type)
C. Electrical tape (and duct tape for later)
D. Two Tamiya '4-speed crank axle gearboxes'
E. Wire
F. Electrical switch
G. Battery pack and batteries
H. Sheet of plastic
I. LomoKino

Instructions

First, remove the LomoKino winding lever.

Next, cut the lever and place half of it back using the wire.

Open your Tamiya box and smile like a child, you finally found a good reason to play with these.

Use these measurements to cut your plastic sheet. Note: 't'= thickness of your plastic sheet, mine was 1.5 mm. Cut the sheet.

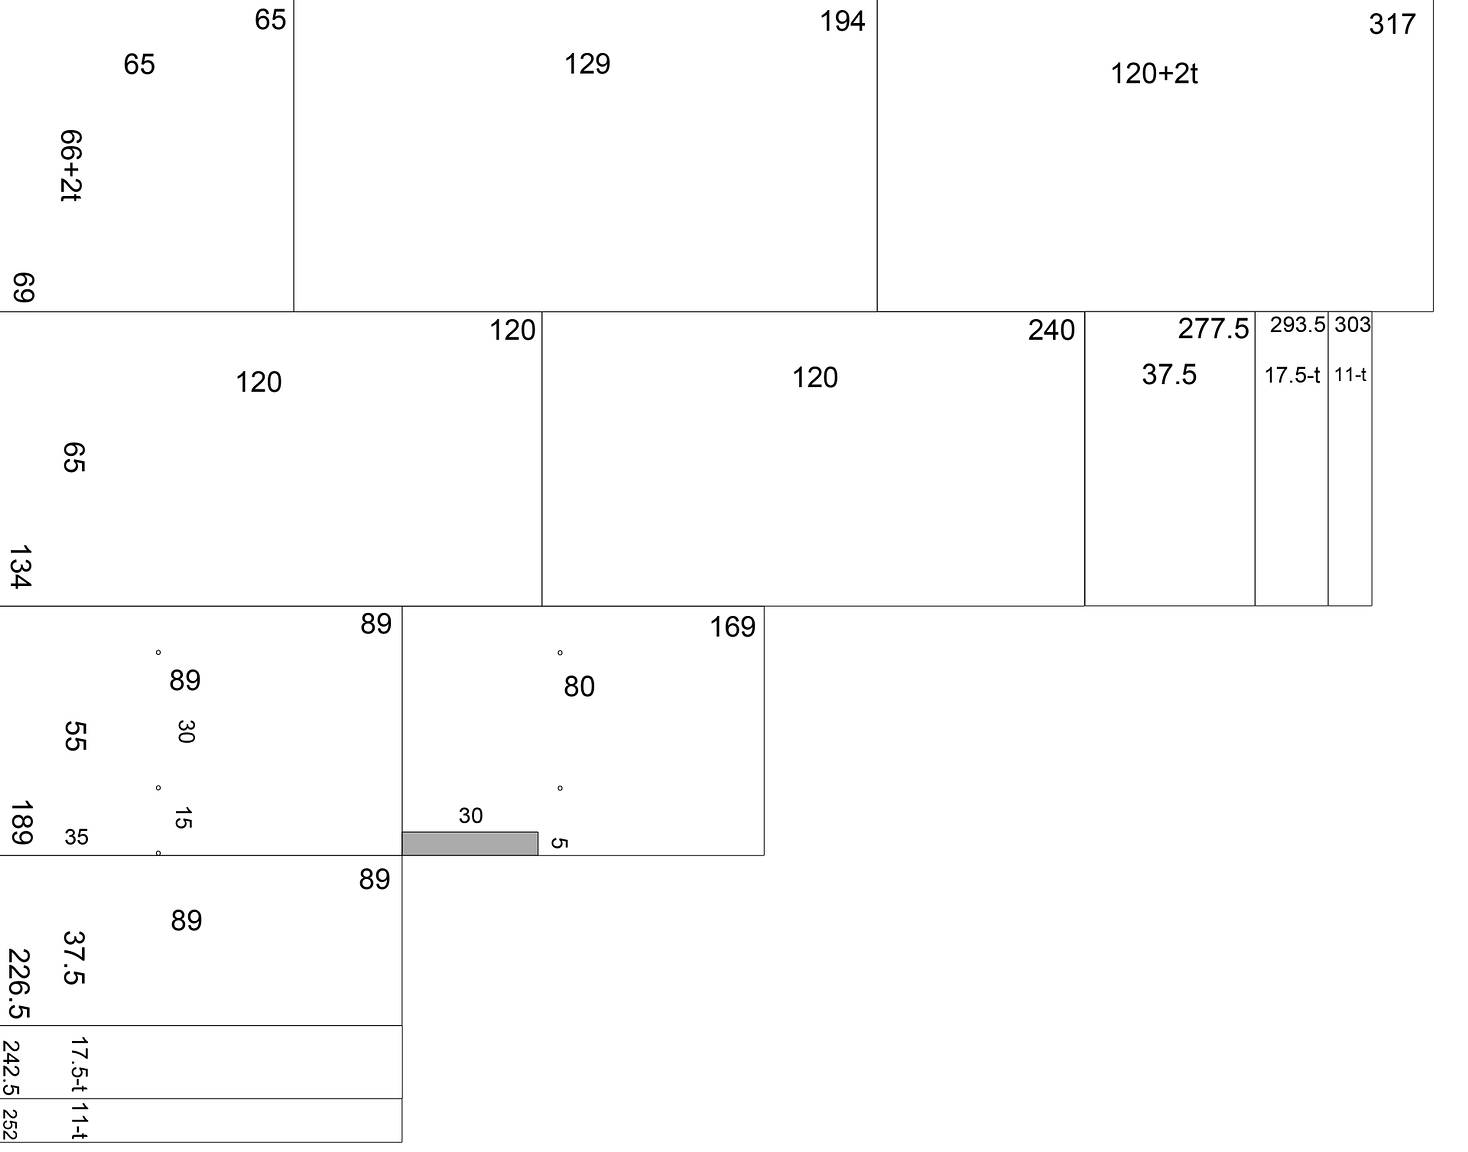
These are the pieces which will hold the gearboxes. There are two different pieces because the gearboxes are in two different configurations (126:1 and 5402:1 gear ratios). Drill holes with an Exacto knife, to fit the gearboxes screws.

These pieces are going to be part of a rail which will hold your gearboxes. My measurements were a bit tight, I had to trim a bit these future rails using sand-paper.

Glue the rails.

Drill a hole at this position and insert one of the little gizmos provided in your Tamiya Kit. The axle extremity will be held in this hole.

Glue the sides and use electrical tape to hold them together.

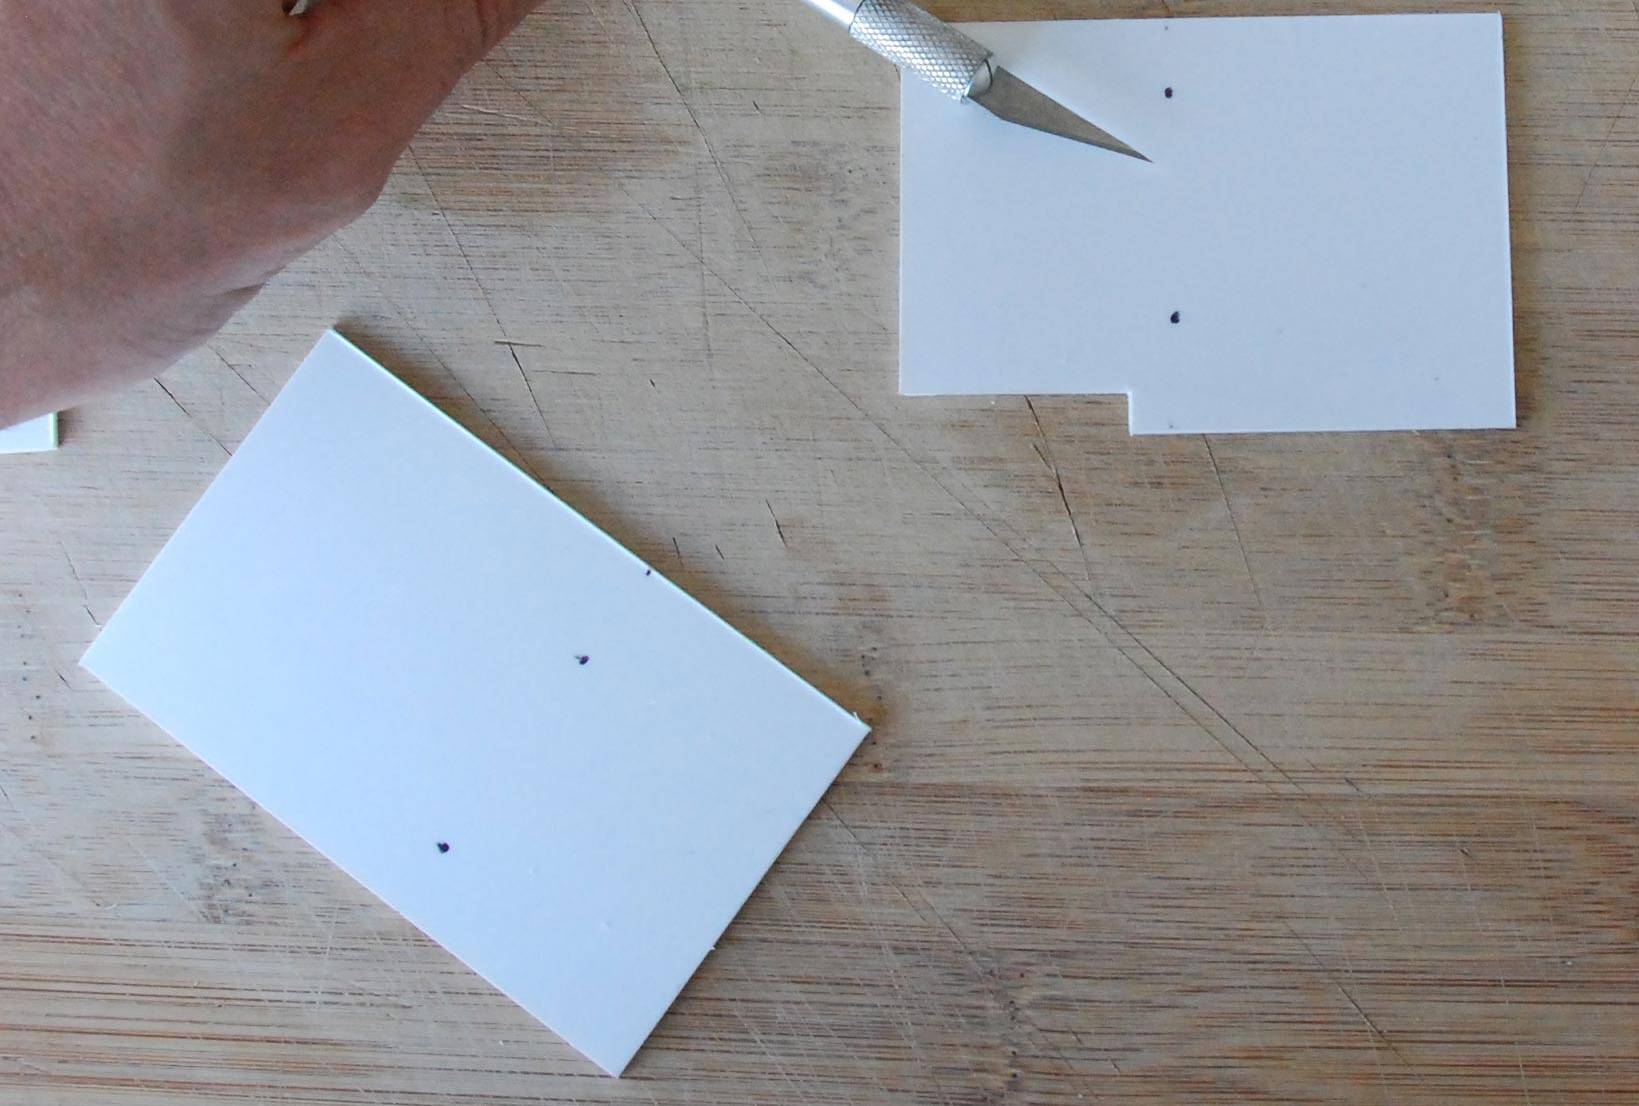
Not surprisingly, my calculations were wrong and I had to trim the gearbox holders a bit... It fits nicely, in the rail, and. the axle goes through the hole. Use a marker to draw where you will.

Cut the axle. Cut these out too while you're at it. Take a remaining piece of your plastic sheet and use a marker to draw a triangle fitting on the top corner of your box. Insert the switch in this triangle. Put some electric wire (provided with the kit) on each electric motor.

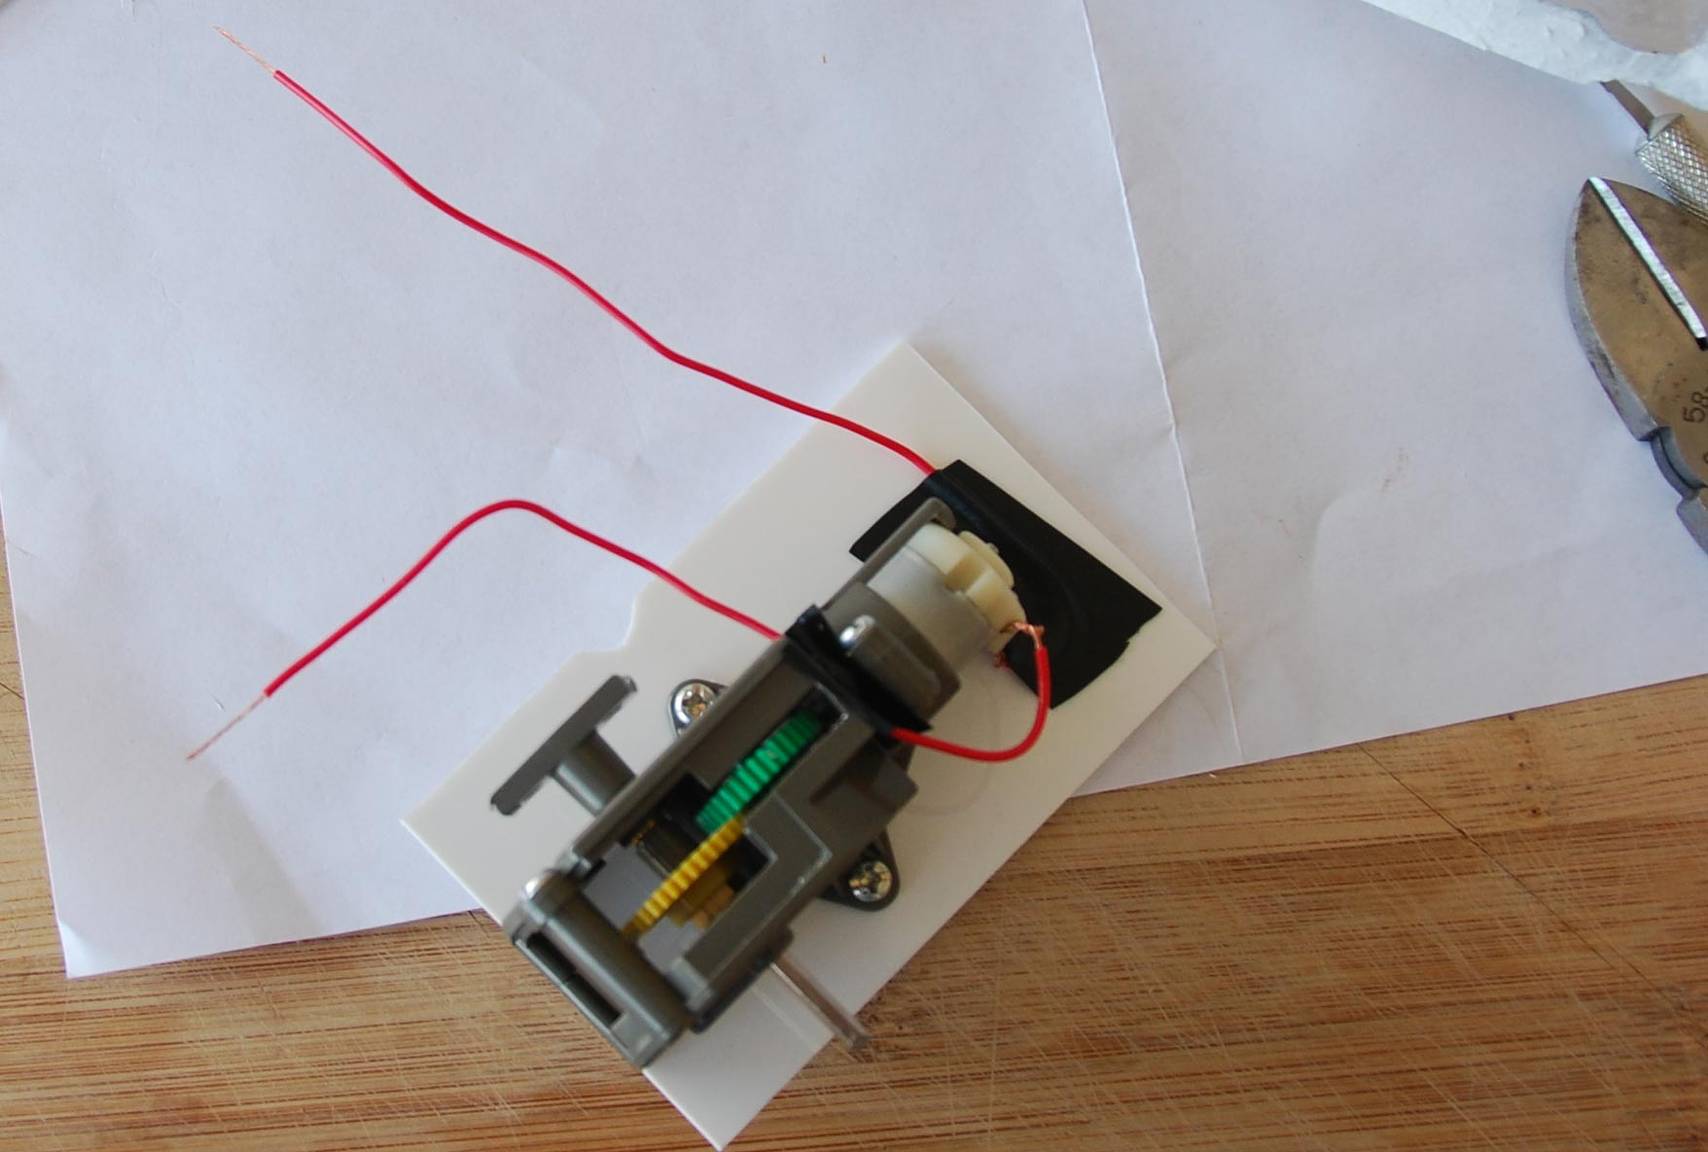
Here's how the wiring should look like:

Drill a hole for a tripod screw. Find back your winding lever and cut the little wheel at the extremity.

With a heated pen, press inside the little wheel to give it a conical shape, in the inside. Using an Exacto knife, trim and cut, to obtain a perfect internal cone. Glue this piece on the axle hole, hold it with a screw while it dries. This extra piece will guide the insertion of the gearbox axle.

Duct-tape a little piece of plastic on the Lomokino lever, to make sure it doesn't lift during the rotation (which would stop the rotation). I didn't have proper electrical connectors, so I made them with duct tape. Make a little hole in the tape and insert one of the wires.

Place the other cable perpendicularly and fold the tape. Your cheap 'connector' is ready.

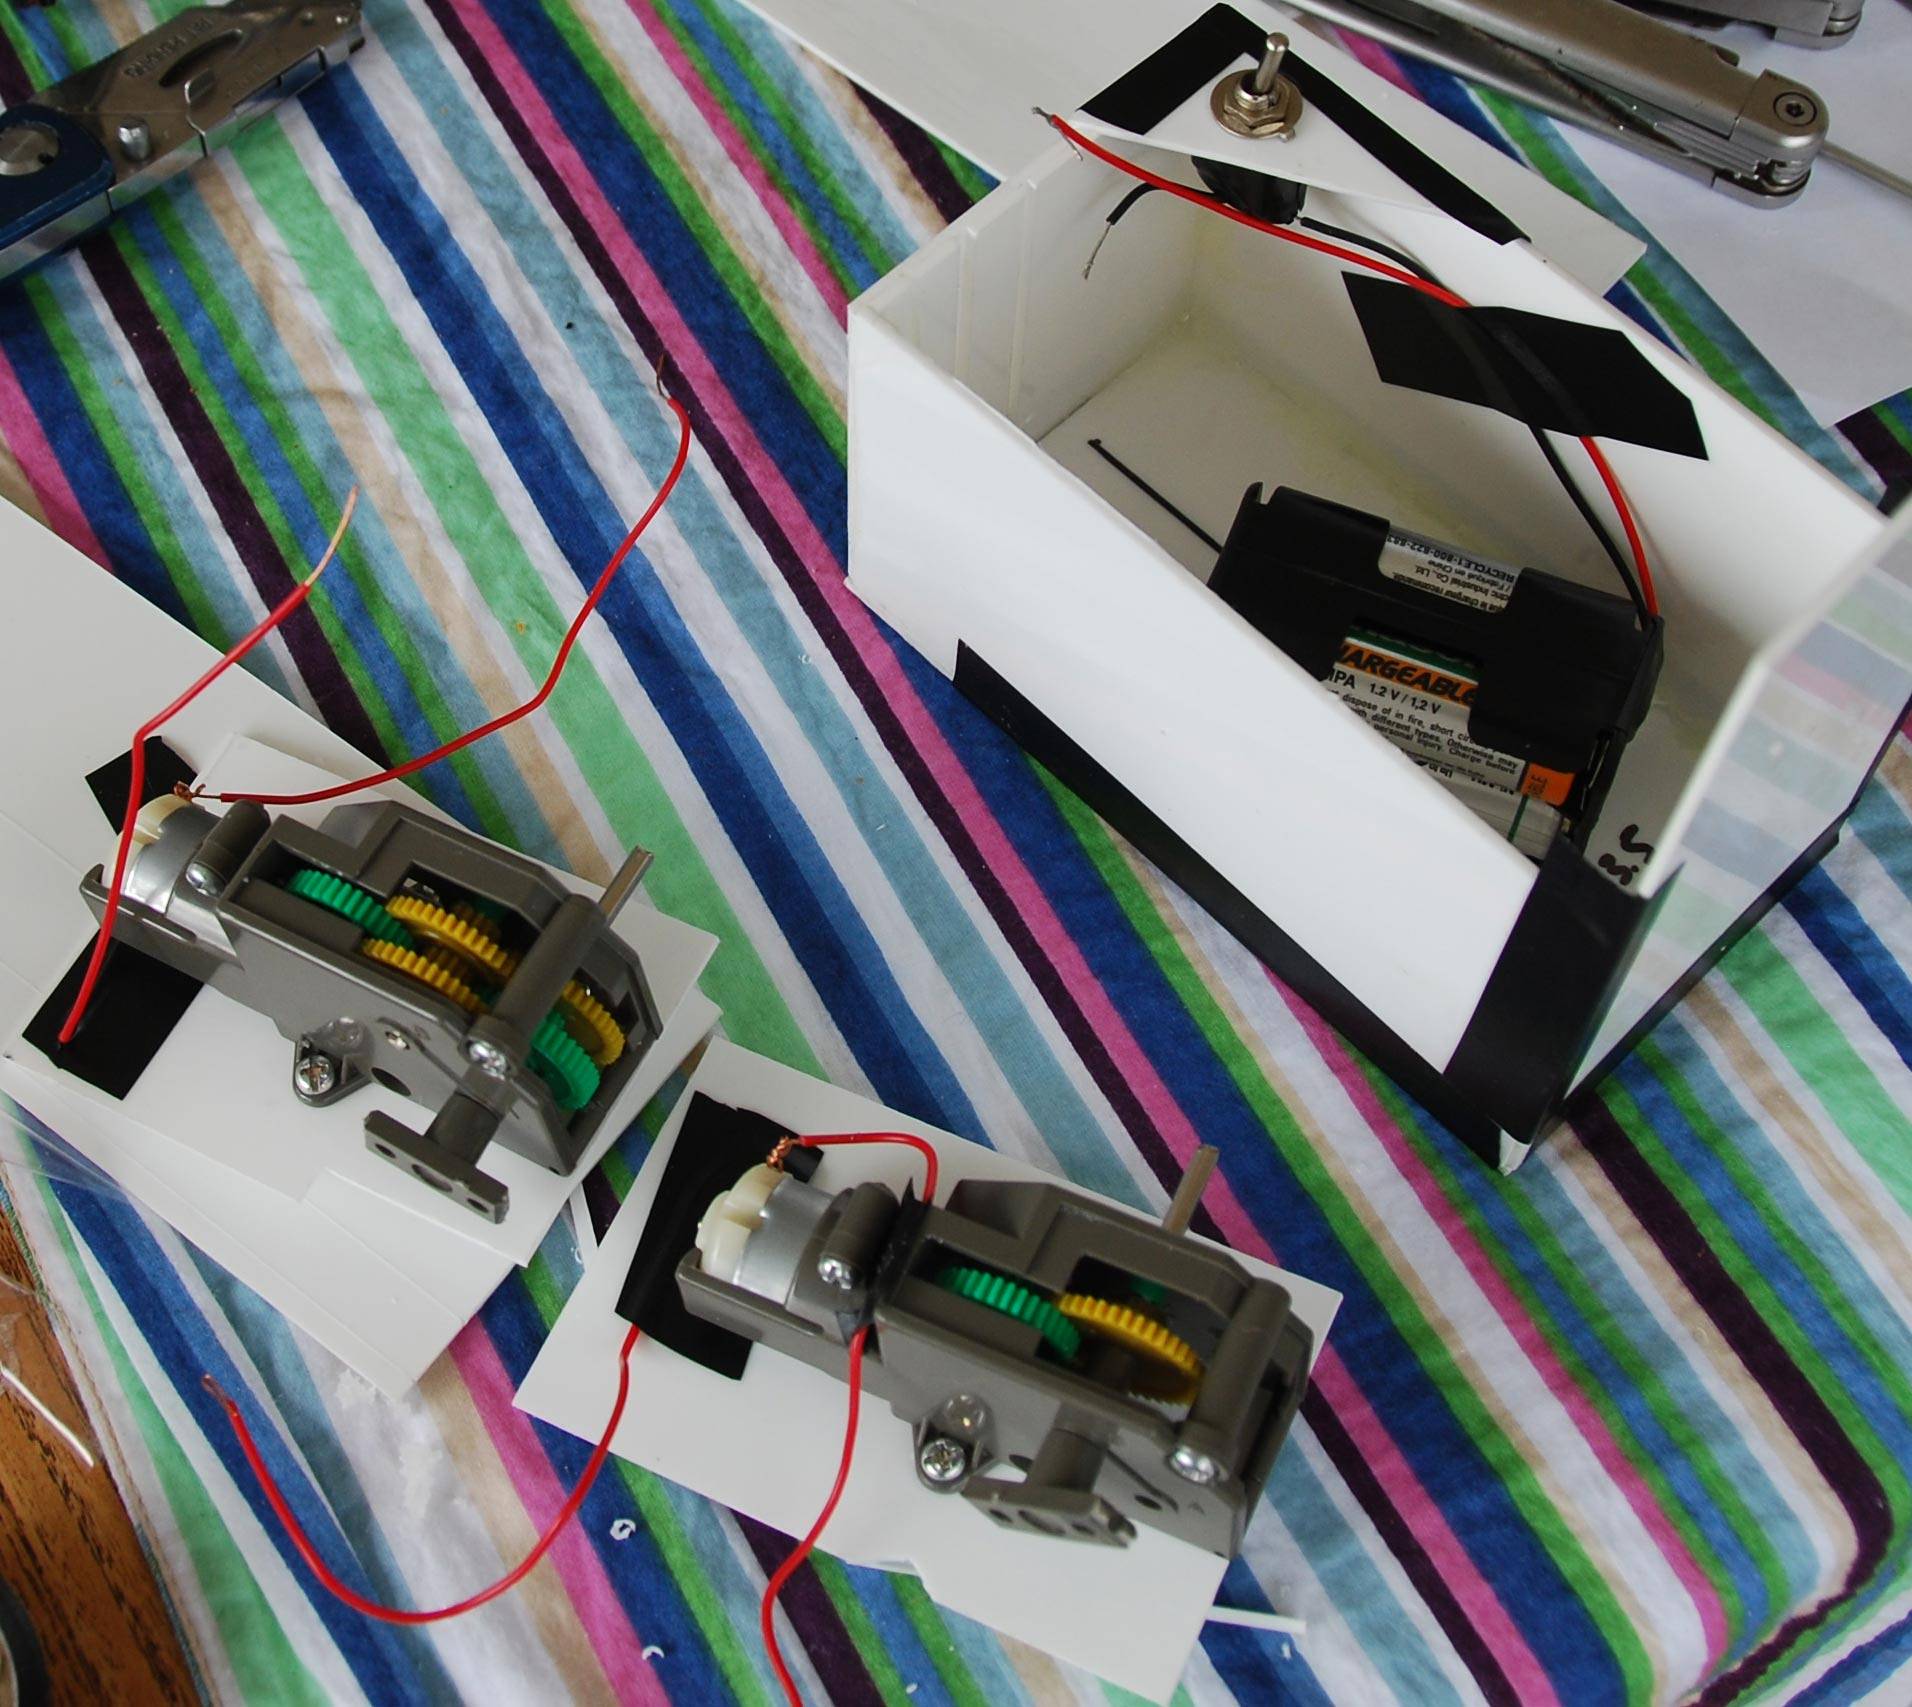
Make another connector inside your box, and connect the gearbox by twisting the wires. Note: make sure you get the right rotation direction (they might differ according to the gearbox setup).

Remove sharp edges from the end of the axle to help its insertion. Get some duct tape and cover the box. Et voilà!

When you are ready to shoot, load a film in your LomoKino. Prepare your wire for an easy fixation to the gearbox, and twist it tightly. Connect your wires. Screw in your tripod mount.

You are now ready to shoot.

As a first test, here's the view from my window. I'll have to find something more exciting next time.

Enter a new analogue dimension with the LomoKino. Lomography’s own 35mm analogue movie camera allows you to capture action and immortalize your story on film! Shoot 144 frames on any 35mm film and create your own cinematic masterpieces. Want to watch your movie the old-school way? We also offer the LomoKino and LomoKinoscope package!

written by stouf on 2011-12-12 #gear #tutorials #videos #diy #camera #tipster #high-speed #camera-modification #time-lapse #lomokino #tamiya #power-winder #lomokino-top-tipster

44 Comments

  1. vgzalez
    vgzalez ·

    ABSOLUTELY AMAZING!

  2. mochilis
    mochilis ·

    Genius, as usual!

  3. neurodiaz
    neurodiaz ·

    O_o HAHA, you're a genius :D

  4. welland
    welland ·

    That is a lot of effort!

  5. coolbober
    coolbober ·

    Sound is just mind blowing

  6. graefin
    graefin ·

    lomoFranknStein :)

  7. crookedlens
    crookedlens ·

    Wow, true innovation!
    Congratulations.

  8. lomodirk
    lomodirk ·

    Stouf is a f...ing awesome hero!

  9. jodidopanki
    jodidopanki ·

    !!!!!!!!!!!!!!!!!!!

  10. adam-payne
    adam-payne ·

    Sticking the transmission to winder with tape seems a little wonky. I'd try to work out an actual physical connection. Other than that, this is brilliant. I was thinking about using an electric screwdriver. This is miles ahead of my thoughts.

  11. li4mc
    li4mc ·

    good idea but if i'm hoest i couldn't stand the noise....
    and for me the winding is all the fun!

  12. kylewis
    kylewis ·

    I wonder if you could add one of those little card sin-song things to counter-act the noise! Brilliant my friend!

  13. itsdebraanne
    itsdebraanne ·

    thats awesome!

  14. gvelasco
    gvelasco ·

    I have problems with steps 3, 4, and 5. "Cut the lever and place half of it back using the wire."

  15. feelux
    feelux ·

    awesome! Insanely creative!

  16. basch75
    basch75 ·

    nice view ;-)

  17. stouf
    stouf ·

    Mmm I originally submitted this post with only one gallery to have steps numbered according to the shot number... Also, I forgot to say that the movies were generated using @mandi 's genius Autokino (www.lomography.com/magazine/tipster/2011/11/11/how-to-turn-…) Thanks mandi : )
    @iidiko, @tikismeekis, @feelux, @mcrstar, @paranoid_expectation, @hxloon, @wapclub, @kylewis, @syroneb, @alexentric, @elletra, @fletchinski84, @freshmeat_omd, @aleintheskywithdiamonds, @fpc, @kelana71, @hughh, @milkshaked, @jodidopanki, @lomodirk, @bloemetje, @daftsavant, @crookedlens, @biondapiccola, @ghuido, @mortal_wombat, @easilydistracted, @ereen, @trashpilotin, @reneg88, @simonh82, @megustastu, @funky69, @shuttersentinel17, @zoe191, @neurodiaz, @lu_bettyb00p, @recurving, @gvelasco, @mochilis, @tomas_bates, @vgzalez, @devoncaulfield, @adzfar, @graefin THANK YOU SO MUCH FOR LIKING THIS !!! You all motivate me to keep being a child ! : )
    @adam-payne The transmission is made with brass wire not tape : ) see shots 2 and 3 in the last gallery
    @kylewis Thanks dear Ky, what are these you're mentioning ? I wish I could make it less noisy !
    @gvelasco Sorry if it's unclear. The bit you have to place back is on the left in photo 4. The wire in photo 5 replaces the little axle you removed in photo 1. See also photo 2 in the last gallery. Is that clearer ?
    Thanks again friends ! You make me feel damn' proud ! : )

  18. disdis
    disdis ·

    definitely you are my f****** hero! This is unbeatable.... thanks for sharing it!

  19. gvelasco
    gvelasco ·

    The instructions were clear in the first place. What I meant was that I don't want to break the handle on mine.

  20. rben675
    rben675 ·

    Not to be a debby downer but that is so annoyingly loud and whiny. ugh.

  21. bridgetj
    bridgetj ·

    Oh, well done!

  22. stouf
    stouf ·

    @disdis I'm very glad you like it my friend ! : )
    @gvelasco Thanks. Yeah it was a tough thing to do, you might come up with a better idea to avoid cutting the handle. Cheers.

  23. yarah
    yarah ·

    hahaha, it looks sooo easy ;) Mán, so great you made this!!! It's amazing :D

  24. eva_eva
    eva_eva ·

    this is freaking awesome!

  25. johann_affendy
    johann_affendy ·

    marvelous!

  26. cwyeung
    cwyeung ·

    It makes LomoKino a real Film Blender!!!!!!!!

  27. stickyvinny
    stickyvinny ·

    That's awesome!

  28. nicolasesc
    nicolasesc ·

    This is pretty insane! I want to see it used to shoot something with a lot of activity to see more of it's capability..Anyway to speed up to 8 frames per second? :)

  29. susielomovitz
    susielomovitz ·

    want that!

  30. liquorice
    liquorice ·

    Awesome!!!

  31. mikeydavies
    mikeydavies ·

    so amazing!

  32. stouf
    stouf ·

    @yarah @eva_eva @johann_affendy @cwyeung @stickyvinny @nicolasesc @susielomovitz @liquorice @mikeydavies Thank you all dear friends !!! You rock ! : )

  33. francisjunio
    francisjunio ·

    Amazing! :D

  34. phantomphoenixphotos
    phantomphoenixphotos ·

    GENIUS! This is legit!

  35. marcustegtmeier
    marcustegtmeier ·

    Very nice and so informative; I love stuff like this!

  36. swampwater
    swampwater ·

    I was thinking of an easy way to do analogue time lapses. Looks like you've solved the problem for me. All I need is a lomokino now! :-p

  37. mcrstar
    mcrstar ·

    awesome

  38. saidseni
    saidseni ·

    Awesome, it should be sold! I need this but not sure I can make it.

  39. mmxi
    mmxi ·

    man, you're genius!

  40. filmprofessorbear
    filmprofessorbear ·

    I've tried something similar, but found the shutter mechanism is durable to handle the torque. have you made any more films?

  41. stouf
    stouf ·

    @filmprofessorbear Yes: www.lomography.com/homes/stouf/movies/2972?order=trending
    And you might like this too:
    www.lomography.com/magazine/236628-stereokino
    Thanks for your interest!

  42. filmprofessorbear
    filmprofessorbear ·

    How did you calculate the Gear Ratio to FPS? I have a Tamiya Planetary Gearbox as my motor and trying to figure the right ratio.

  43. stouf
    stouf ·

    I didn't. I just tried what I had and it looked fine. Plus you'll have room to adjust the FPS when you put your frames together when editing the movie (by adjusting the duration of each frame). Good luck!

  44. stouf
    stouf ·

    @filmprofessorbear I didn't. I just tried what I had and it looked fine. Plus you'll have room to adjust the FPS when you put your frames together when editing the movie (by adjusting the duration of each frame). Good luck!

More Interesting Articles