From Plans to 3D Prints — an Interview With Todd Schlemmer
1 14 Share Tweet“Making” is something that we're all familiar with, especially here in our analogue community. Taking photographs is a form of creation, we make images when inspiration strikes or when the opportunity presents itself. We take these moments and commit them to memory and on something more tangible — film.
Todd Schlemmer is also a maker... of a lot of things actually. He creates beautiful 3D printed pinhole cameras that are durable, functional, and earth-friendly. We had the pleasure of talking to him about his work and process and we have to say that there really is a lot more to learn. Let him walk you through his creation process and who knows, maybe his work can inspire you to take up 3D printing as well.

Hi, Todd. Welcome to the Lomography Magazine. Please introduce yourself to our readers.
Hi, my name is Todd Schlemmer, I’m a firefighter and paramedic living in Seattle, Washington. I love making photographs, but I have many interests and hobbies. Lately I have been using 3D printing to design and create pinhole cameras, which I also freely share for anyone to download, print, and shoot.
Where did your fascination in pinhole cameras come from?
In fifth grade, my class made crappy little pinhole cameras using cardboard and 110 film cartridges. I don’t think any of my photos came out, but the idea of lensless photography lodged in a dark corner of my brain. About ten years ago, while procrastinating on studying for an important exam, I went down a pinhole photography rabbit hole on the Internet and decided to build a camera. I used basswood and doorskin, with all the brass bric-a-brac I could find. The Pinhead1 weighed more than three pounds, and was very slow (f/256), prone to light leaks and fat rolls, but it made photographs! I shot more film, refining my technique, quickly deciding that I wanted to build another camera, a better camera. Ultimately, I built several cameras out of wood and cardboard before I got busy with something else (building a small boat) and set the pinhole cameras aside for a while.


How did your interest in 3D printing begin?
My first memory of 3D printing, or “rapid prototyping” is from an 80’s science and technology television show. Manufacturers, like Boeing, were using the new technology to take drafting work from computer assisted design software and transform it into tangible, hold-it-in-your-hands objects. I was fascinated. The printer I first saw used intersecting laser beams (lasers!) to solidify UV sensitive resins, a process known as stereolithography. Fast forward 25 years and the original patents protecting 3D printing technology were beginning to expire.
I consider myself a “maker” and I avidly followed the growth of 3D printing from the first open source 3D printer projects. Hobbyists began building machines that 3D printed through a process known as Fused Depositional Modeling (FDM). Essentially a tiny computer-controlled glue gun attached to a three-dimensional Etch-a-Sketch, these printers create solid objects layer by thin layer, literally drawing the outline of the part with a thin noodle of thermoplastic, and then filling in the middle. The open source Arduino (microcontroller) and RepRap (Replicating Rapid-Prototyper) projects made it possible for motivated enthusiasts to go into production, building printers from readily-available hardware and laser-cut and 3D printed parts. Backed by crowd-sourced funding, shared and promoted through social media, 3D printers and kits became available at a hobbyist price point. I had no idea what I was going to do with a 3D printer, but I knew I wanted one.

I bought a Printrbot Plus 3D printer kit, designed and sold by a clever man named Brook Drumm. It cost $750.00 and I had to assemble every part of it except the electronic control board. It was mostly constructed from precisely-laser-cut birch plywood, and smelled ever so slightly of campfire. Putting it together gave me an intimate understanding of my 3D printer’s workings, which would serve me well if it rattled loose or parts broke.
At first, I downloaded and printed things that other people had designed and shared on a website called Thingiverse. I knew I wanted to bring my own designs to life, and I began teaching myself the basics of simple Computer-Assisted-Design tools. I used that first machine to 3D print the parts for two more printers, including a small portable printer of my own design.

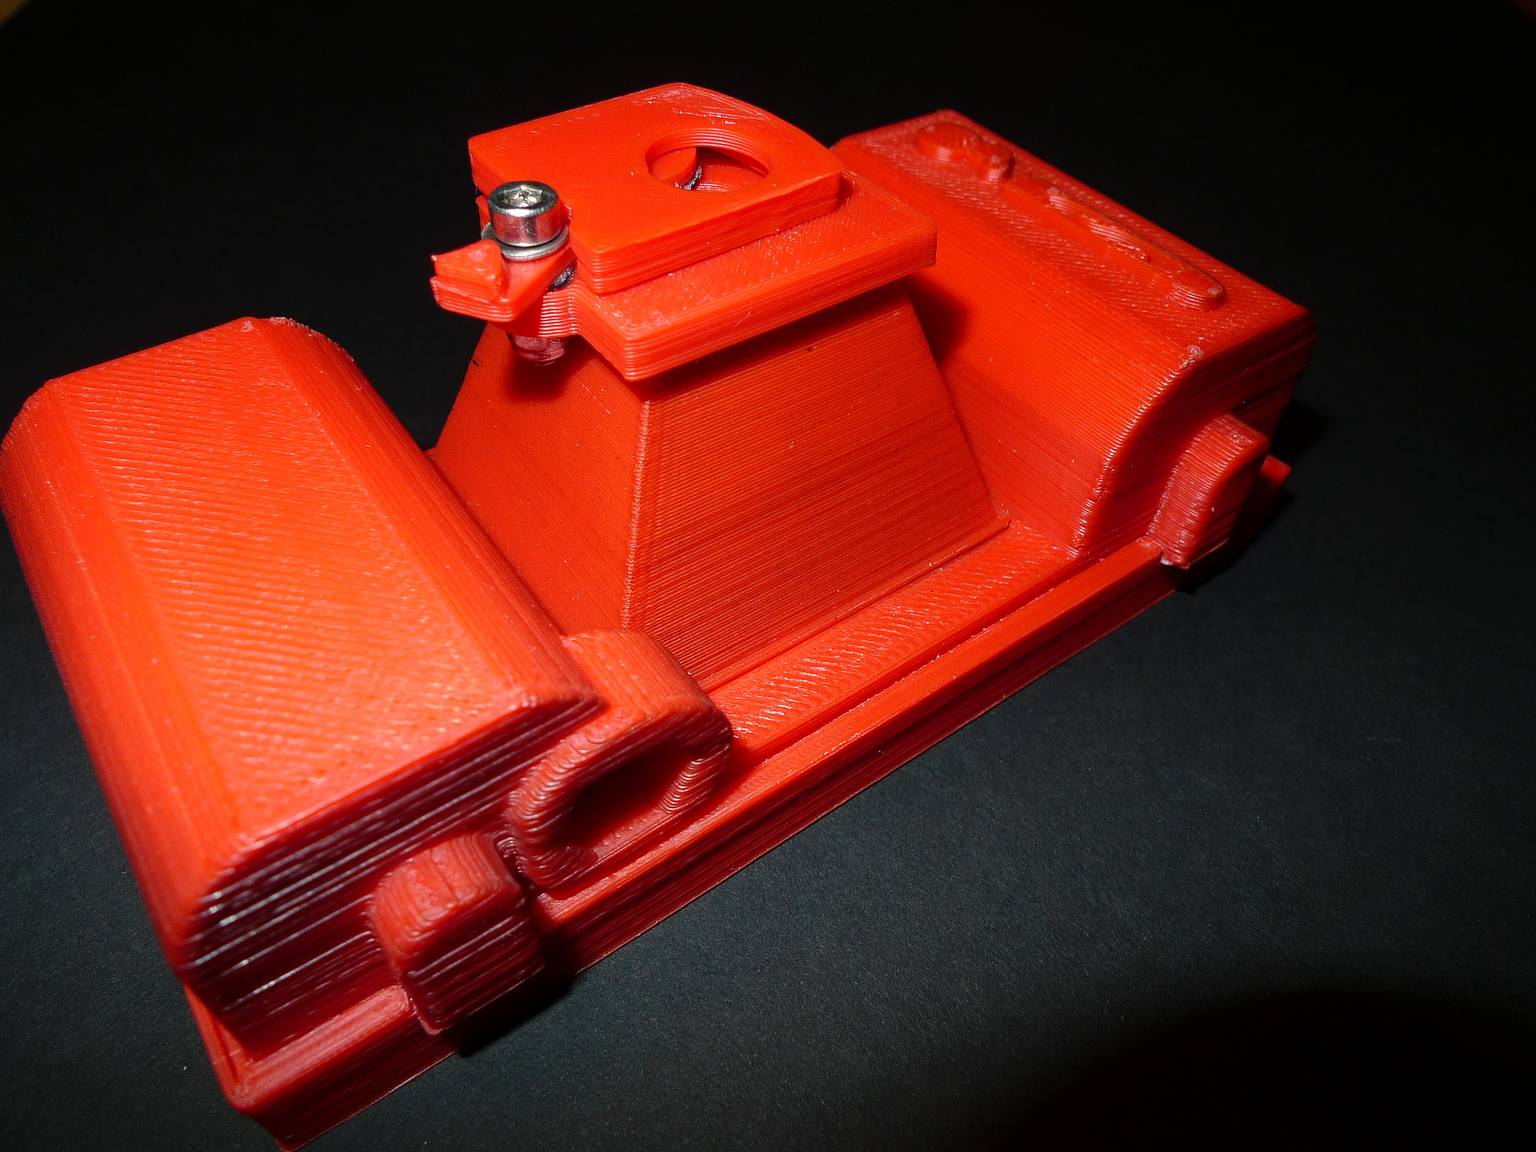
I was looking for a design challenge and wondered if I could 3D print a pinhole camera. I had consumed the shared resources of Open Source hardware and software for years, and I knew that I would also share my design work. My first camera, the PINHE4D, was an exercise in ugly utility that used 135 film, but made great photos — much better than my first wooden cameras. A month later I published the PINH5AD, a 4x5 pinhole camera that was my first foray into large format. The success of these designs, and the enthusiasm I experienced on social media was very encouraging. I returned to medium format pinhole with the P6*6. After designing the P6*6 I made a considerable effort to document how to 3D print, assemble and shoot it. Thingiverse featured the design, and my documentation evolved into an article for MAKE magazine. I have a lot of affection for the P6*6, but my 3D printed cameras continue to improve, and I would recommend any number of my newer designs over the idiosyncrasies of that camera.
Why choose that material and process?
There are dozens of different polymers that can be 3D printed with hobbyist machines these days. When I started 3D printing, however, there were really just two choices: ABS or PLA. ABS is a styrene-based plastic that excels for injection-molding. It is the same plastic that LEGO are made from. PLA, Polylactide, is a bio-plastic made from plants. ABS is actually an ideal material for making cameras. Dense, strong, and flexible, I started with ABS. It has superior mechanical properties, and is absolutely opaque. However, it is very finicky to print with. It must be printed on a heated surface, it’s prone to warping in cooler environments, and it smells like cancer when heated to melting. Most of these issues can be mitigated by putting your 3D printer in a box, but the non-recyclable waste continued to bother me.
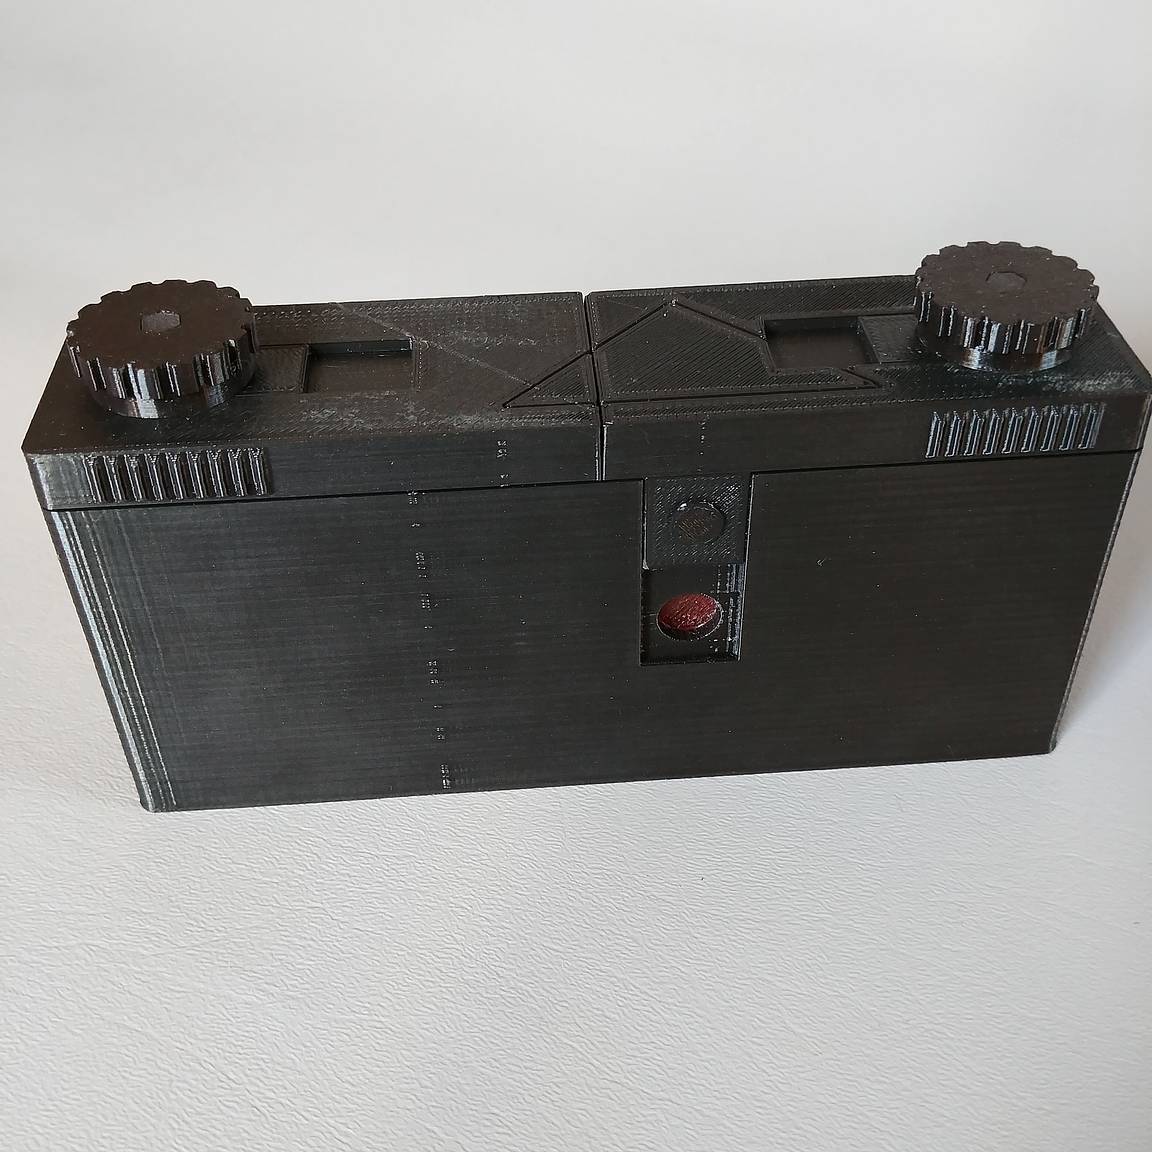
I continued to print with ABS for a couple of years, until I upgraded the P6*6, creating the first in the terraPin family of 3D printed pinhole cameras. At the same time, I upgraded my printer to a Lulzbot Taz 4, a much larger and better-constructed Open Source machine. I made the decision to switch to PLA, which is commercially compostable, and actually pleasant to print with, smelling something like maple syrup. I started with an inexpensive PLA filament that just happened to be opaque. Many PLA filaments are, in fact, translucent, and I have since learned how few filaments are actually opaque enough for photographic applications, after the manufacturer of my preferred material decided to switch from coloring their black PLA with pigments and changed to a dark purple dye. The cameras made from this new formulation weren’t light tight, and film would slowly fog inside them.


I chose 3D printing in thermoplastics because I had the technology at hand, but I didn’t know if it would actually work. 3D printing has been used to make functional parts for machines like 3D printers, clocks, drones, and now cameras. It pleases me that a 3D printed camera is easily as durable as a wooden camera, but, when printed with a bio-plastic, can be composted away at the end of its life.
In hindsight, 3D printing turned out to be a wondrous way to iteratively create a functional object like a pinhole camera. Making changes to the design in software takes a moment and then the printer does the rest. When all the parts work and fit the way I’d like, I share the design and instructions on how to create the camera.
What are the challenges in designing and creating 3D printed cameras?
First, and foremost, finding PLA filament that is opaque has proven to be harder than I expected. I have seen a number of cameras that were printed with translucent material and it’s a frustrating defect. I made a pink camera for @ShellySometimes, and, even with a coat of black paint inside, it was unusable. If you’re following along at home, I have been using eSun black PLA for the last year with great results.


Designing for 3D printing has its challenges. For instance, overhangs cannot exceed 45 degrees without some kind of (removable) support structure. There is also a limit to the distance an unsupported gap can be “bridged”. I try to design such that no support is necessary to print my cameras, even though all slicing software (a step where the design is sliced into printable layers) has automated support generation. Cleaning off support structures is a pain in the neck, and that should be reason enough to avoid it. Designing for support-less printing often means multiple parts that must fit together perfectly, and also be light-tight. Engineering tolerances between parts becomes very important.
I share all my camera designs in the hope that people will download, 3D print, assemble, and shoot them. Toward that end, I am very responsive to questions on Thingiverse. Anticipating, mitigating, and supporting my user’s issues has driven me to simplify construction, minimize non-printed parts / fasteners, and craft better instructional documentation. It typically takes longer to write the documentation than it does to design a camera. Right now, I have several cameras that are waiting on documentation before I can publish them.


What's your favorite 3D printed project so far?
If you’re asking about my projects, I have a stereo pinhole camera, based on the OSKAR, which is a lot of fun to shoot. It’s one of my yet-to-be-documented projects that is waiting to be published at this writing. Stereo images from this camera can be viewed on Flickr.
I would direct you to Enabling the Future. "The e-NABLE Community is an amazing group of individuals from all over the world who are using their 3D printers to create free 3D printed hands and arms for those in need of an upper limb assistive device.”
Thousands of 3D printed hands and prosthetics have been created, at no cost, for the (mostly) kids who need them. The designs for the prosthetics are open source and have been highly refined through iterative design work by volunteers all over the world. As kids grow or parts wear out, replacements are inexpensive and easy to get. The e-Nable project perfectly illustrates how 3D printing is disrupting manufacturing, design, medicine, and geopolitics. This is why the Internet was invented.


Walk us through your design process. What are the steps in creating 3D printed cameras?
It all starts with the frame. I’ve made cameras that use non-standard frames and it just complicates using the camera and wastes film. I believe the larger the frame, the better the pinhole photograph. I also like the convenience of roll film. For these reasons, most of my cameras use medium format 120 film with the standard 6x6, 6x4.5, and 6x9 frames.


After I’ve settled on a frame size, the “focal length” dictates the angle of view and suggests a pinhole diameter. The math governing pinhole optics is not complicated, but I use a calculator application called PinholeDesigner. I make my own pinholes, so I am not constrained by the discreet pinhole sizes commercially available. A lot of people, however, have been seduced by the idea of the perfect laser-drilled pinhole. The pinhole, believe it or don’t, is not the most critical part of making a pinhole camera, and paying for laser-cut precision (especially the wrong size) is just wasted money in my opinion.
At this point, I have a frame, a “focal length”, an angle of view, and a pinhole diameter. The “focal length” (FL) and pinhole diameter (D) give me an f/number (f/# = FL/D), and now I have all the specifications of a pinhole camera. I also have a pretty good idea how big the camera will be after I add the film spools on each side of the frame.
NOW I can start designing in CAD. The negative spaces inside the camera are critical to its design, and I must accommodate the light’s path to expose the film, the spaces for the film to move through the camera, and the manner in which the pinhole is mounted and how the shutter moves in the camera. These negative spaces dictate the external shape and form, but how that looks is purely at my discretion.
This is the fun part of designing pinhole cameras. I want it to look like a camera, and I want it to feel like a camera in your hands. I use a lot of texture to convey a tactile message about utility, but also visually express capability and reliability. The shutter, the winding knobs, how to open the camera, should be self-evident at first glance. I think that you should know how the camera works – and have a sense of how well – just by looking at it.
How did people receive your creations when you were starting out?
There were a variety of reactions, some of which were kind of discouraging. In hindsight, it was premature to announce what I was doing before I had any sample photographs to share. I was really excited, and I had begun to believe that what I was creating would work really well. There was also a surging enthusiasm for this “new 3D printing thing,” which garnered some attention from technology writers and what we now call the “maker community.”


However, when I shared my first 3D printed pinhole camera on APUG (Analog Photography Users Group) I got a lot of condescension and misunderstanding. I was asked why I would even bother when it was so easy to modify an existing point and shoot camera. I was told that “there is no better pinhole camera than anamorphic 617 pinhole camera” implying that I shouldn’t waste my time. Someone actually complained the pictures I shared could be sharper. To be fair, there were a few supportive voices in the forum, but the message I took away was “Not interested in anything new here”.
But then I started sharing my cameras and photography on Twitter, and discovered an amazing community of (film) photographers. MAKE: Magazine included me in a list of “100 Makers to Follow on Twitter” which was very encouraging – I created the P6*6 in direct response to that nod from MAKE:. I reached out to local (Seattle) pinhole photographers @jana_obscura and @espressobuzz to help me refine my P6*6 kits and assembly instructions. The pinhole communities on Twitter and, now, Facebook and Instagram, are a great bunch of people, many of whom have become fast friends.
Still, my cameras garner more interest than my photos, but I guess anyone can make photos.
Any new projects in the near future?
Since I started making cameras, I haven’t wanted for ideas and inspiration. I find that many of my projects were catalyzed by conversations or requests from pinhole photographers on social media and elsewhere. I was recently listening to the new Lensless Podcast and was inspired to design and 3D print an easy-to-build “matchbox pinhole.” I’m not much of a 135 pinhole enthusiast, but I think an extremely wide angle, tiny, simple camera has a lot of play and educational value. In the spirit of matchbox cameras, it would be very bare-bones and gaffer tape.


I want to make a few more photo books. I’ve been shooting a lot of stereo pinhole lately and I think that would make for a nice collection. I am also working on a noir comic that I want to shoot entirely in B&W pinhole, 135 for a deliberate high-contrast lo-fi look. The human elements of such a project (casting, shooting, and other logistics) are probably the most difficult. The story is mostly written, I just need to start.
I haven’t made a 6X12 camera, but I am constantly asked about it. It’s probably time to make that happen. An anamorphic camera would be another good project, and I’d like to solve some of the problems I have seen in existing cameras – film transport issues, assembly, and viewfinding.
Stay tuned.
What is your message to people who are interested in doing a camera project of their own?
There are so many ways to make a photograph; don’t let anyone tell you what your photography should look like. Don’t be afraid to fail; every failure is a valuable lesson. Expect to succeed and eventually you will. If I can help in any way, let me know!
We would like to thank Todd for sharing with us his amazing work and inspiring stories. If you're interested to see more of his cameras and photos, you may head over to his Thingiverse account and Flickr for more. You may also follow Todd on Twitter, Facebook, and Instagram for regular updates.
written by cheeo on 2018-05-04 #gear #people #pinhole-photography #pinhole-camera #3d-printing #todd-schlemmer


One Comment