Fix the Sticky-Shutter Problem of the LC-A
18 31 Share TweetSometimes, you can get your hands on an old Lomo LC-A, but then you notice that the shutter is not working properly. With this tutorial, I'll show you how to disassemble, clean, and reassemble your LC-A so that it will work again.
These are the tools I used:
- cross-headed screwdriver (size 00)
- flat-headed screwdriver (size 2.4 & 2.0)
- match stick with one end cut flat headed
- tweezer
- cotton buds
- isopropyl alcohol
You will need the matchstick to loosen the leatherette of the LC-A because some screws are under it. When you are disassembling the camera, work gently and be cautious so you do not pull of any wires. Otherwise, you have to solder them back!
Disassembling the LC-A
Before you can clean the shutter blades, you have to disassemble the camera. First, the lens protection will be taken off. For this, you have to unscrew the screws on both sides. There are two screws on each side.

After the lens protection, we will remove the top. You have to remove the leatherette because one of the screws is underneath it. Two screws are on the backside and the last two screws are under the rewind lever.


To get on these screws you have to remove the rewind lever. So for this, hold the rewind shaft still and then you can unscrew the whole rewind lever top by moving it anti-clockwise.

Now we take off the bottom. After removing the plastic part of the bottom, you can see the black foam pad which holds the battery door. Please take note that this pad is loose and it falls off easily out of the camera. After unscrewing the top and bottom of the body, the next part is the viewfinder. First, you unscrew the circuit board and then the viewfinder.


After removing the viewfinder you can see a little sliding rod underneath it. This rod is for the needle in the viewfinder to show in which zone the lens is focused at. Take it out with the tweezer.

Removing the Lens
After we disassembled the body we will now remove the lens to get to the shutter blades. First, we lift the cocking arm and swing it away. Then, we unscrew the negative battery connector because it is attached to the circuit board which is around the lens.


Now we unscrew the rings around the lens. The last ring can be easily pulled off, and after removing the rings we loose the screws of the lens plate (blue marks) and the screws which hold the lens plate on the body (red marks).

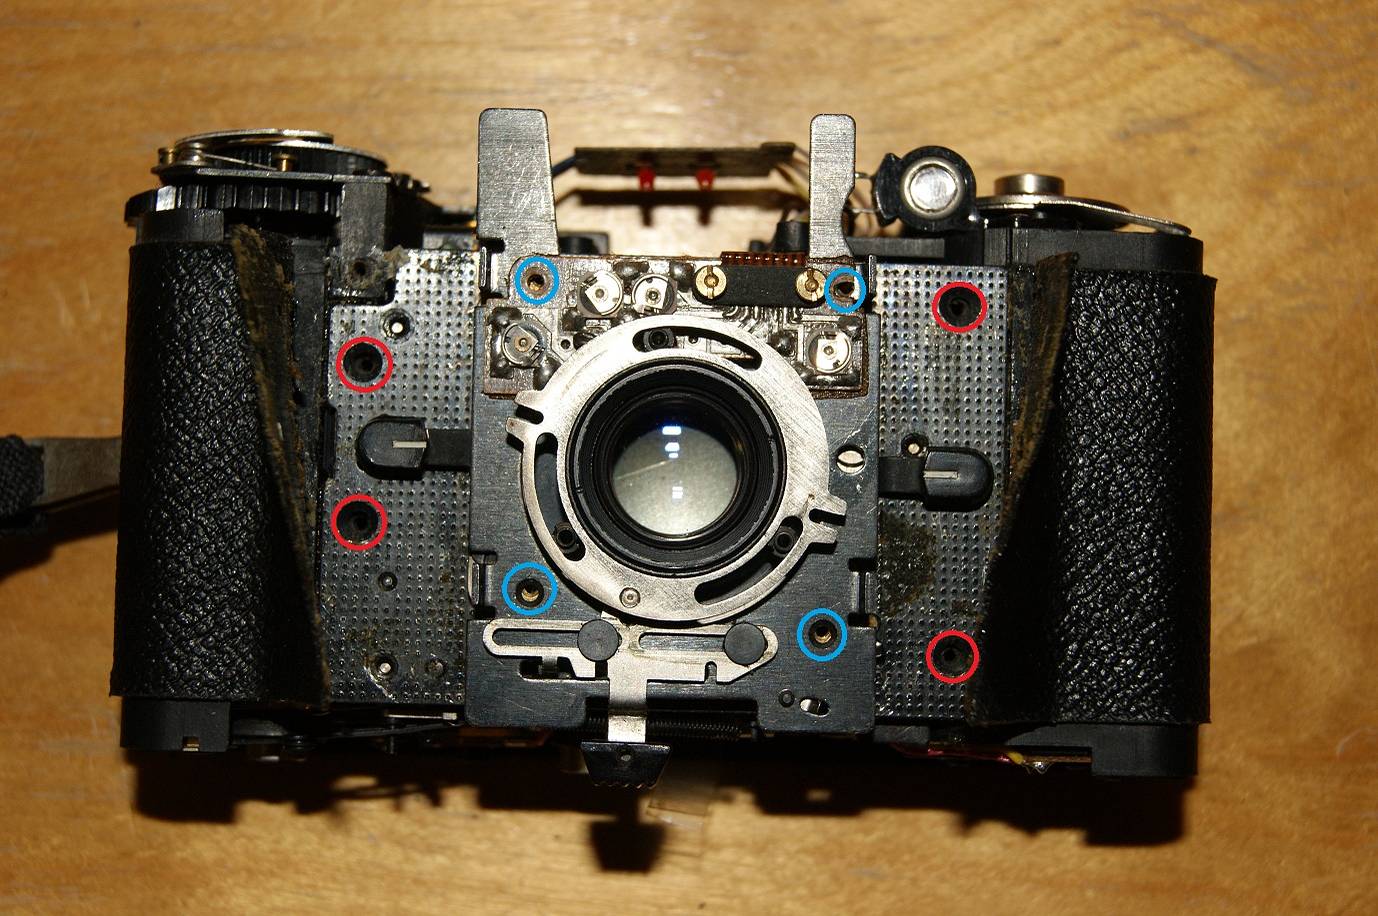
When the unscrewing is done you can remove the lens plate from the body (be careful both parts are still connected through some wires). Now you can loosen the screws of the circuit board (yellow marks) and of the lens (red marks). When you are done, lift both parts and then you can remove a sliding contact. The next step is to unscrew the last connection of the circuit board and shutter to have the shutter free from the LC-A.


Cleaning the Shutter
After removing the shutter plate from the body and lens you can now start to clean it. To get to the shutter blades, just unscrew the last three screws.

After removing the metal plate you can now remove each blade separately (be cautious here: the blades may not be bent). To clean the blades, use the cotton buds soaked in isopropyl alcohol. Clean both sides of the blades and also the plates where the shutter blades are attached to.


Reassembling the LC-A
To reassemble the camera just do the steps backwards. When putting the camera back together, watch out that the cocking arm is in the right position.

When the top is put back on, the little metal plate has to be underneath it because it resets the frame counter when the back door is opened. Have fun bringing some old LC-A cameras back to life!
Get your hands on your own Lomo LC-A with its improved successor, the Lomo LC-A+ at the Online Shop and gallery stores worldwide.
written by tesatscad on 2013-02-21 #gear #tutorials #lc-a #camera #tutorial #repair #tipster #problem #shutter #fix #sticky-shutter


18 Comments