The Ultimate DIY C-41 DevelopingTutorial - Part 2
50 88 Share TweetHello again, analogue lovers! I hope you haven't been waiting too long for the second part of this tutorial. I hope that now you're well-informed on the basic equipment you'll need for C-41 home development, you're ready for the actual development process itself, which we will be covering in its entirety in this article.
I also hope that once this tutorial is over, it will be a brave new analogue world out there for those of you who have always wanted to develop your own films but never found the courage to.
In this half, I won't be talking about the scientific aspects of developing. I will simply give you the steps on how exactly to develop your own color films, which is also how you cross-process slide films. This way, you won't get too overwhelmed or confused.
Anyway, without further ado, let us start the second and most important part of this tutorial.

Mixing Your Chemicals
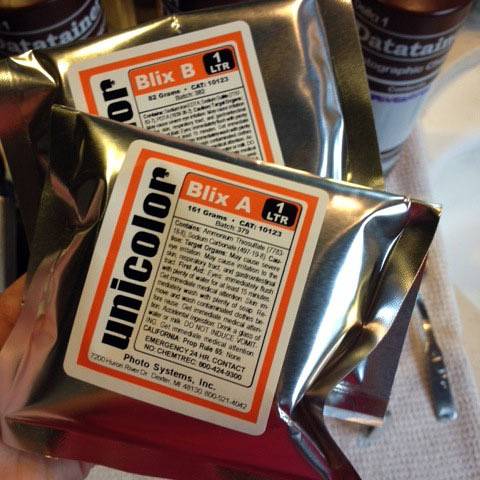
Development kits always come with mixing instructions. As I've mentioned in the first part, I personally use the Unicolor C-41 Powder Kit, which is less than $20 for 1 Liter mixtures. So the mixing steps that I will cover will be for the Unicolor kit. If you have a different kit, don't worry. The mixing processes of these kits will be similar and equally easy!
Step 1: Label Your Chemical Containers - Before you start mixing your solutions, make sure that you already have your chemical containers labeled "Developer", "Blix", and "Stabilizer". This way, in the future you won't accidentally mix your chemicals or pour one chemical in the wrong bottle. I know it sounds like an impossible and dumb mistake but when you have a lot on your mind, it's an easy one to make. Be especially cautious with the Developer; it must not get contaminated with the Blix, which has Bleach in it.

Step 2: Diluting the Developer - To dilute the Developer, which at first will be in powder form, you must use clean tap water at 110°F or 43.5°C. Check the water temperature with your thermometer.
- Fill your plastic measuring pitcher with clean tap water at 110°F or 43.5°C up to 800mL.
- Open the pouch containing the Developer and pour all the contents into the pitcher. Mix thoroughly then add more water to make a 1000mL solution.
- When you're sure that all the powder has dissolved, transfer your developer into the container labeled "Developer". Use a regular kitchen funnel to prevent spills.


Step 3: Mixing the Blix - You will have two pouches in the kit for the Blix (also known as the Bleach-Fix). They are labeled "Blix A" and "Blix B". You will be mixing both powders using clean tap water at 110°F or 43.5°C, just like with the Developer. Check the water temperature with your thermometer. Also, make sure you have proper ventilation when mixing your Blix because it has a rather strong smell that can make you lightheaded when inhaled directly.
- Fill your plastic measuring pitcher with clean tap water at 110°F or 43.5°C up to 800mL.
- First open the pouch marked "Blix A" and pour all the contents into the pitcher. Then open the pouch marked "Blix B" and also pour it into the pitcher. Mix thoroughly then add more water to make a 1000mL solution.
- When you're sure that all the powder has dissolved, transfer your Blix into the container labeled "Blix". Use a regular kitchen funnel to prevent spills.


Step 4: Diluting the Stabilizer - Room temperature water is all you need to dilute the Stabilizer. Just fill your measuring pitcher with 900mL of clear tap water in room temperature, pour the powder from the small pouch labeled Stabilizer, mix thoroughly, then add more water to make a 1000mL solution. Pour this solution into the container labeled "Stabilizer".


Now you're done mixing your chemicals! Wasn't that a piece of cake?! The good news is, the development part is as easy as that! Are you ready for it? Let's do it!
Developing C-41 at Home
Step 1: Preparation - Before you can actually develop something, you'll need something to develop. To start, be ready with a single roll of exposed 35mm film. You would want to limit it to one roll on your first try so you wouldn't be wasting any films in case you don't get it right the first time.
- Load your exposed film in the reel, which you're then going to load in the development tank. You must do this in complete darkness or in a changing bag. Once your film is loaded and your tank is closed tightly, you must NOT open the tank until you're finished with the development process. As long as it is tightly closed, it's safe to take the tank out of the changing bag.
Reminder: you do not need a darkroom to develop your film. after the film is safely sealed in the development tank, you will not have to worry about it being exposed to light and you can complete the process in normal lighting conditions. - Soak the containers with your Developer and your Blix solution in a sink full of hot water until both are at 102°F or 38.8°C. Use your thermometer to monitor the temperature. This might prove a little tricky at first but trust me, after a few tries you'll find it easy to get or even know when you'll have the right temperature.


Pre-soak - A pre-soak means soaking your exposed film for a short period of time to wash off the dyes on the film so that they won't contaminate your Developer. Pre-soak your film in the development tank in clean tap water at 102°F or 38.8°C.
- Agitate with your little agitator and soak for exactly 1 minute.
- After 1 minute, pour all the water out of the tank without opening it. (In some kits, it is not necessary but with the Unicolor kit, it's included in the instructions).
- Check on your Developer and Blix. Make sure that they both get to exactly 102°F or 38.8°C. Take care not to contaminate your Developer with your Blix if you're only using one thermometer. Rinse that thermometer in between! When both are at right temperatures, take them out of the sink to avoid overheating.


Step 2: Developing - Before starting, make sure that you have everything you need within easy reach - your chemicals, the sink and faucet, the funnel, the agitator, and your timer. You'll feel like you have a lot in your hands the first few times so putting these within accessible distance guarantees a more fluid process.
- Pour out any excess water from the tank.
- Then pour the Developer into the tank. Pour enough so that it is level with the opening at the lid.
- Start your timer.
- Agitate with the agitator for 15 seconds (as shown in the photo) then cover the tank.
- Flip tank gently 4 times every 30 seconds. Tap tank gently on the edge of the sink to pop the bubbles that could have formed inside during flipping. You will repeat these steps every 30 seconds for 3 minutes exactly. Do not go over that unless you are planning on pushing your film.
- At 3:25, begin pouring the developer back into the proper container using a funnel (as shown in the photo). This will make your developing time at 3:30.


Step 3: Blix - I don't know the science behind it but the Blix (also Bleach-Fix) removes the undeveloped silver halide and the metallic silver that appears during developing from the film. So soaking the film in Blix is a very important part of the process. Soaking your film in Blix is much like soaking your film in the Developer, except you'll need to do it longer.
- Check with your thermometer to see that your Blix is at the right temperature.
- Follow the same steps you used with the Developer. First, pour enough Blix in the tank so that the liquid is level with the opening at the lid the start your timer.
- Agitate for 15 seconds then cover.
- Flip tank 4 times but there's NO NEED to tap. Repeat every 30 seconds for 6 minutes.
- At 6:25, pour Blix back into the proper container using your funnel.
Step 4: Wash - After you pour out the Blix from the tank, you will need to wash your film again. Use running water at 95 to 105°F or 35 to 40.5°C and fill the tank (as shown in the photo). Agitate quickly then leave it soaking for 3 minutes. Pour the water out after.

Step 5: Stabilizer - The Stabilizer, although many could argue is not necessary, is used to prevent watermarking on your negatives during the drying process. This step is the easiest and the last! Just pour enough Stabilizer in your tank so that it is level with the opening, agitate for 15 seconds, leave for 1 minute, then pour back into the container.


Step 6: Take the film out and dry - I like to do a quick rinse after the Stabilizer. I just pour water in, shake it up for a few seconds, then pour it back out. Just to make sure I'm taking the excess chemicals off. After the Stabilizer though, It is safe to open the tank and reveal your film, which you have now successfully turned into a negative. However, that negative will be very wet.
- Take the film out of the tank and reel.
- Remove the excess water with your squeegee or your (very clean) fingers.
- Hang it to dry using clothespins. Make sure to keep it away from the elements and from any surfaces.
- When the film is completely dry, you can cut and start developing!


There, wasn't that easy? Seriously, you won't even break a sweat (unless you're doing it in the middle of the desert). It does sound intimidating at first but once you've done it, you'll wonder why people make it sound so hard to do it. You won't even need experience in developing black-and-white films to do C-41 developing at home successfully.
I hope I've made the steps easy enough to understand and provided enough photos so you can visualize beforehand what exactly you'll be doing when you're finally doing it yourself. But if this isn't enough, here's a link to a video version, which I know will help you more.
So go on. Do it already. I look forward to seeing your results!
This article was written by Community Member blueskyandhardrock.
written by blueskyandhardrock on 2013-05-01 #gear #tutorials #film #diy #c-41 #tutorial #home #tipster #development #do-it-yourself #film-development #blueskyandhardrock #a-beginner-s-guide


50 Comments