How to Scan Sprockets with Different Scanners
14 45 Share TweetDid you ever wonder how people get this nice sprocket holes on their pictures? Get yourself a medium format camera and a scanner and start making you own! I did it with two different scanners and would like to share the results with you. Perhaps you also have a scanner at home that is capable to do it!

When using a medium format camera, it is possible to modify it for using 35mm pictures. Or you just use one of the backs offered for example for Holga and Diana. The effect of this type of photography is a lightened perforation. But in the common photo labs it is not possible to order pictures with the perforation, so the best way is to buy a scanner and do it yourself, or ask a friend with a scanner.
When I got my Diana I ordered directly the 35mm back, although there are different tutorials in the internet how to use 35mm films without this. But there are so many possibilities of making mistakes (counting the clicks, having everything light resistant, …) and I know myself, so it seemed the best solution.


For my first results, I used the scanner that my flatmate had fortunately at home, it was a HP Scanjet 3970 including the necessary drivers. This Scanner has a very small part for scanning negatives, you only could process two or three pictures at once, and the negative has to be cut on one side. This was very bad for me, because I first had nice overlapping panorama shoots and I didn’t want to cut them. Anyway I had to be happy to use this scanner, because after a few modifications, it was possible to scan the sprockets, too.
The mask that is used normally holds the negative at the sides where the sprockets are, and hides them. But we cut a piece of plexiglass in the same size, and when using this, we could take the perforation, too. Cutting plexiglass is very easy. You take a cutter knife and mark the area you want to have, and then simply break it. Only problem had been the Newtons rings. And after a few uses the plexiglass turned dirty and scratched.
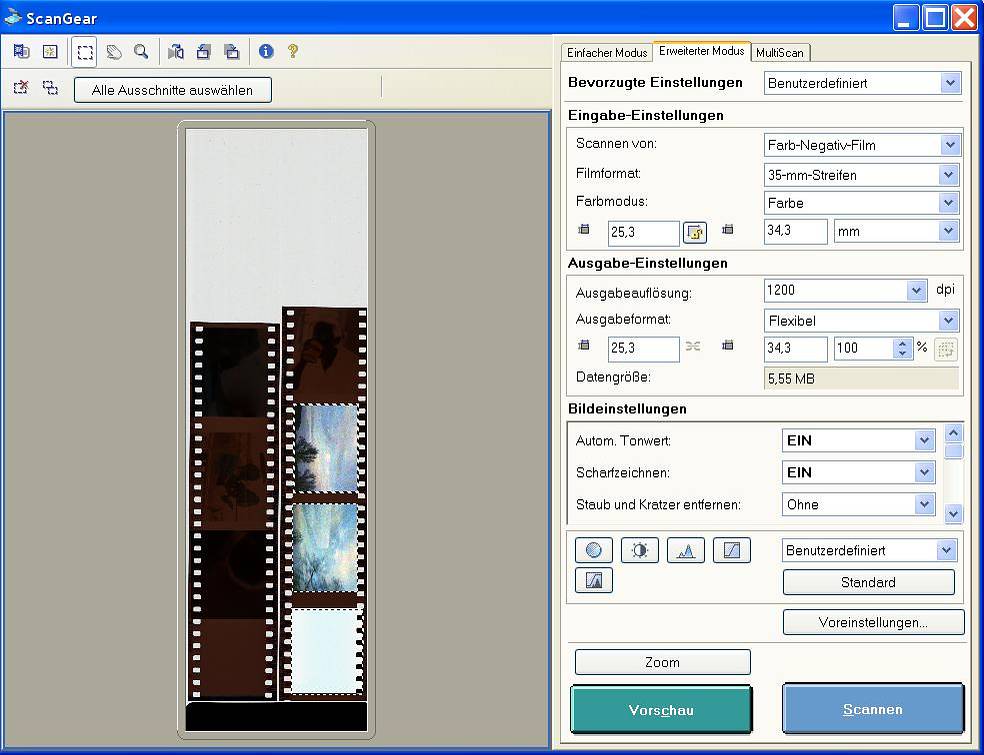
The scanner is not usable for 120 films I had scanned exactly one picture, after adjusting it half an hour on the glass, and decided that this is not a practicable process for a whole film. So I got myself to Christmas a new scanner, which is the Canon 8800F with the software Scangear (included when buying the scanner)
This is perhaps one of the mostly common scanners for scanning negatives, but at the beginning, the use wasn’t as intuitive as I thought. We had some fights, but nowadays we are good friends, although I still hate it that it hasn’t a „Standart“ for scanning the pictures and always interprets them depending on the colours. Must be something with the internal white balance.
The scanner comes with three different masks: 35mm pictures without perforation, 120 and dia slides.
For scanning the sprockets, it is possible to modify the 35mm mask and breaking out some parts. Or you can use the medium format mask and put some rubbers around it to hold the negatives. I simply lay them on the glass, for adjusting I use a squared freezer magnet (it’s not possible to adjust them at the border because then it will not be complete on the scan). The position for the negatives can be seen at the notches for holding the mask.
Now the preview in Scan Gear can be started. If you do not see the negatives, just the pictures as the software would choose them, it is possible that the wrong preview mode is selected. Then you have to click the button for deactivating miniature preview in the left top of the program. If you now choose the pictures with sprockets, they turn in light blue/white/something because the software has problems to interpret the sprockets. Now first choose the picture without the sprockets and then press the „Set“ button in the advanced mode. After this, you can move the boundaries of the chosen picture over the sprockets. Then you klick scan and that’s it!


You can find a detailed video by artpunk about this which helped me a lot:
Scanning For Sprockets from artpunk on Vimeo.
written by shoujoai on 2010-08-21 #gear #tutorials #35mm-back #sprockets #canon #scanning #tipster #holga #diana #perforation #hp-scanjet #middle-format #scangear #top-tipster-techniques


14 Comments