Tipster: How to Create Truly Painterly Images Out of Unwanted Negatives
1 30 Share TweetA long-time fan of plastic cameras, Argentinean writer and photographer Lorraine Healy is the author of “Tricks With A Plastic Wonder,” a manual for achieving better results with a Holga camera. In this tipster, Healy shares a simple process to turn negatives you don’t really care about into “pictoric works of art”.

Last spring and summer I was having a real problem with birds eating the vegetable seeds in my garden, and deer eating the more tender limbs of trees around the house. I had seen neighbors everywhere using some sort of shiny plastic ribbons bought at our local hardware store. I had also seen my dear friend and mentor use old movie film all around her trees and leaving them hanging for almost a year. She uses the results for a different purpose but it gave me the idea of tying long strips of negatives, both in 35mm and 120 formats, around the garden beds and the trees in the front of the property, and see if they worked to keep birds and deer away. This tipster describes a process that takes anywhere from a few weeks to a year, depending on how much exposure to the elements the negatives get.
Choose Your Negatives And Chromes
We all shoot with great abandon and live by the Lomo rules of taking our cameras everywhere and shooting LOTS. This means that by the time we see our negatives and slides developed, there are usually a few images that are ... let’s say, not stellar. Start piling these strips in one place, a big plastic bag will do. Color, slide, black & white—your choice or all of them.
Tie Them In Places Outside
Even if you don’t have flower beds, or a vegetable garden or trees to be protected from deer at home, you want to find a place to tie your negatives where they will be hit by rain, wind, and sun. I tie a good length of sewing thread through a sprocket hole in the 35mm or punch a hole in a corner of a 120 strip and then add the thread. I have found that grouping lengths of film fairly close together ensures that they will interact when wet, leaving random marks on each other or even fragments of emulsion.

Wait, wait, wait! Give them time!
It’s hard not to feel protective of your “flying negatives,” which is why I recommend using those that you wouldn’t save any way. How long you need to leave them out there will depend on the weather where you live, the type of negative, how close you group them, and how much “action” you want to allow. I suggest checking them every couple of weeks, and if you see them get to a point that looks good to you, pull the strip. You may want to grab another one from your bag and put it outside as a replacement. I noticed that it was especially easy to determine how much deterioration I wanted with the slide strips. As it is a positive image, it is just easier to judge the amount of pitting and emulsion-loss that are happening.

And Then, What?
After picking all the negatives and chromes I had flapping for a good many months, I let them dry on parchment paper (the cooking kind is fine). Some of the slide film had gotten so loose after 12 weeks outside I decided to try to do some emulsion transfers with these, using the same process done with instant film. Well, it didn’t quite work, but I managed to stick them into watercolor paper using watered-down glue, and I quite like the results. I am not very skilled in these techniques, so I’m sure someone who does emulsion transfers reliably would find these to be super easy to work with.
I went through all of my “flying” strips of film after it had dried, and could see dirt, bits of debris embedded on the base, as well as scratches, pits, water stains, sunburns. Not everything worked, of course, but that was all right. They had already done their duty protecting my trees and harvest of vegetables! The ones I really liked, I scanned without washing them of whatever they had picked.
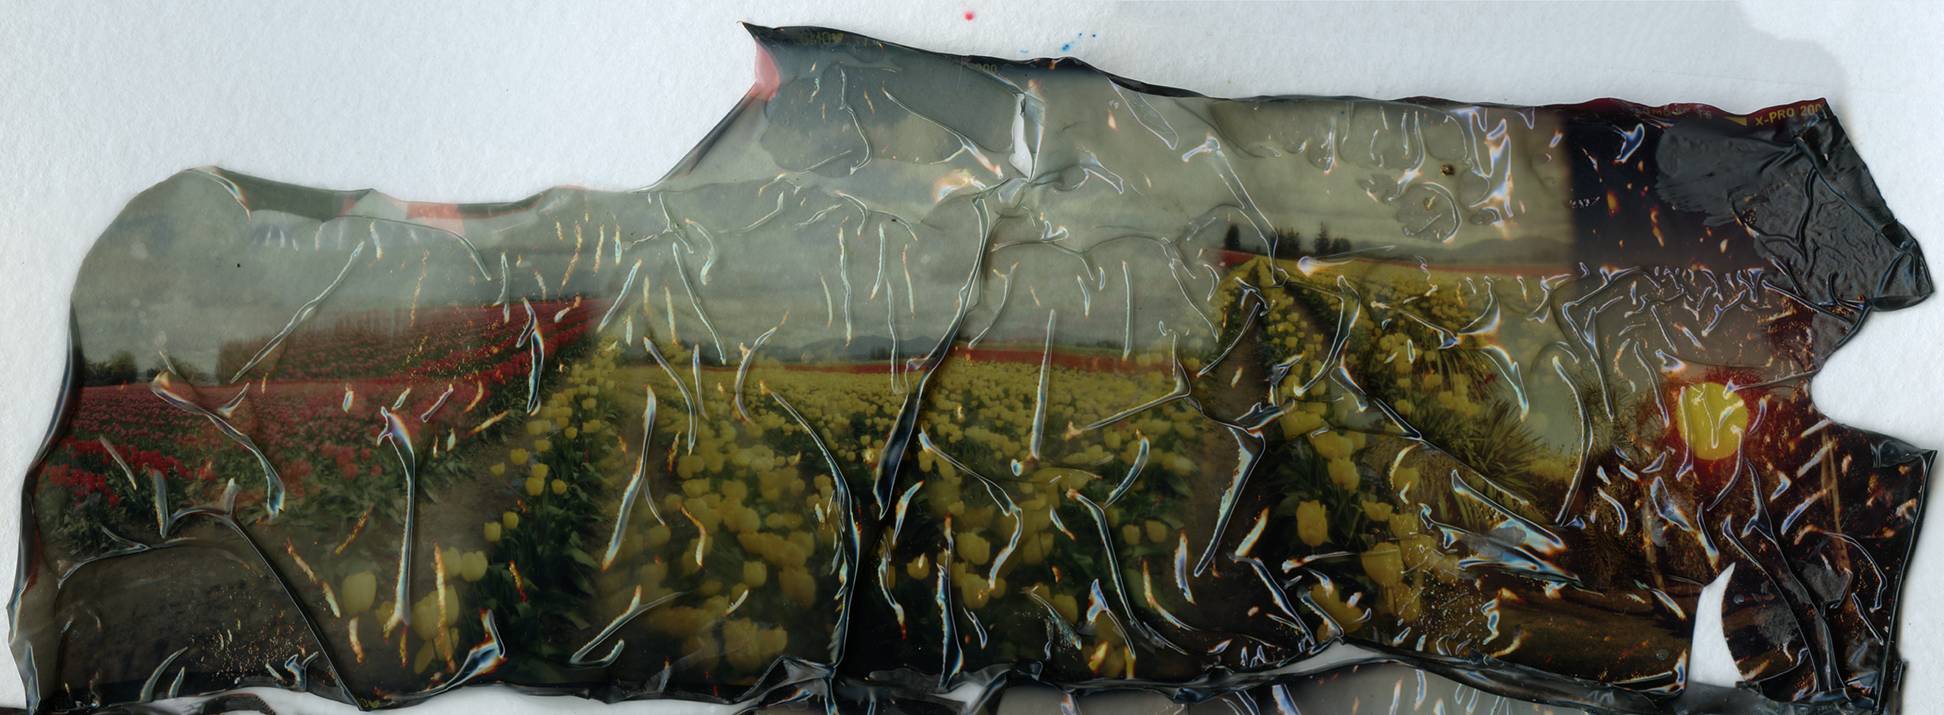
My favorite from the 2017 gardening season started out as a strip of Velvia shot with the LC-A+ during the Skagit Valley Tulip Festival in April of last year. It was not a set of particularly arresting images, compared to others I had taken, so it went to work keeping birds away from vegetables. I was stunned to see the results after almost six months flapping near other negatives (you can see the extraneous sprocket marks diagonally towards the top of the image). It made for a photograph I truly love, pictorial in an abstract way that also allows one to see what the original was like.

Lorraine Healy (@lorrainehealy) is an Argentinean writer and photographer living in the Pacific Northwest. A long-time fan of plastic cameras and she is the author of “Tricks With A Plastic Wonder,” a manual for achieving better results with a Holga camera, available as an eBook from Amazon.com.
written by Lorraine Healy on 2018-03-10 #tutorials #120 #35mm #chrome #tipster #negative-film










One Comment