How to Fix Your Diana Mini's Film Adance Problems on Your Own

100

Diana Mini is a great camera, and with this quick modification, we will make it better. When I could not find the answers I was looking for, I took matters into my own hands. I have a knack for taking things apart and fixing them so I thought this would be easy, and I was right.

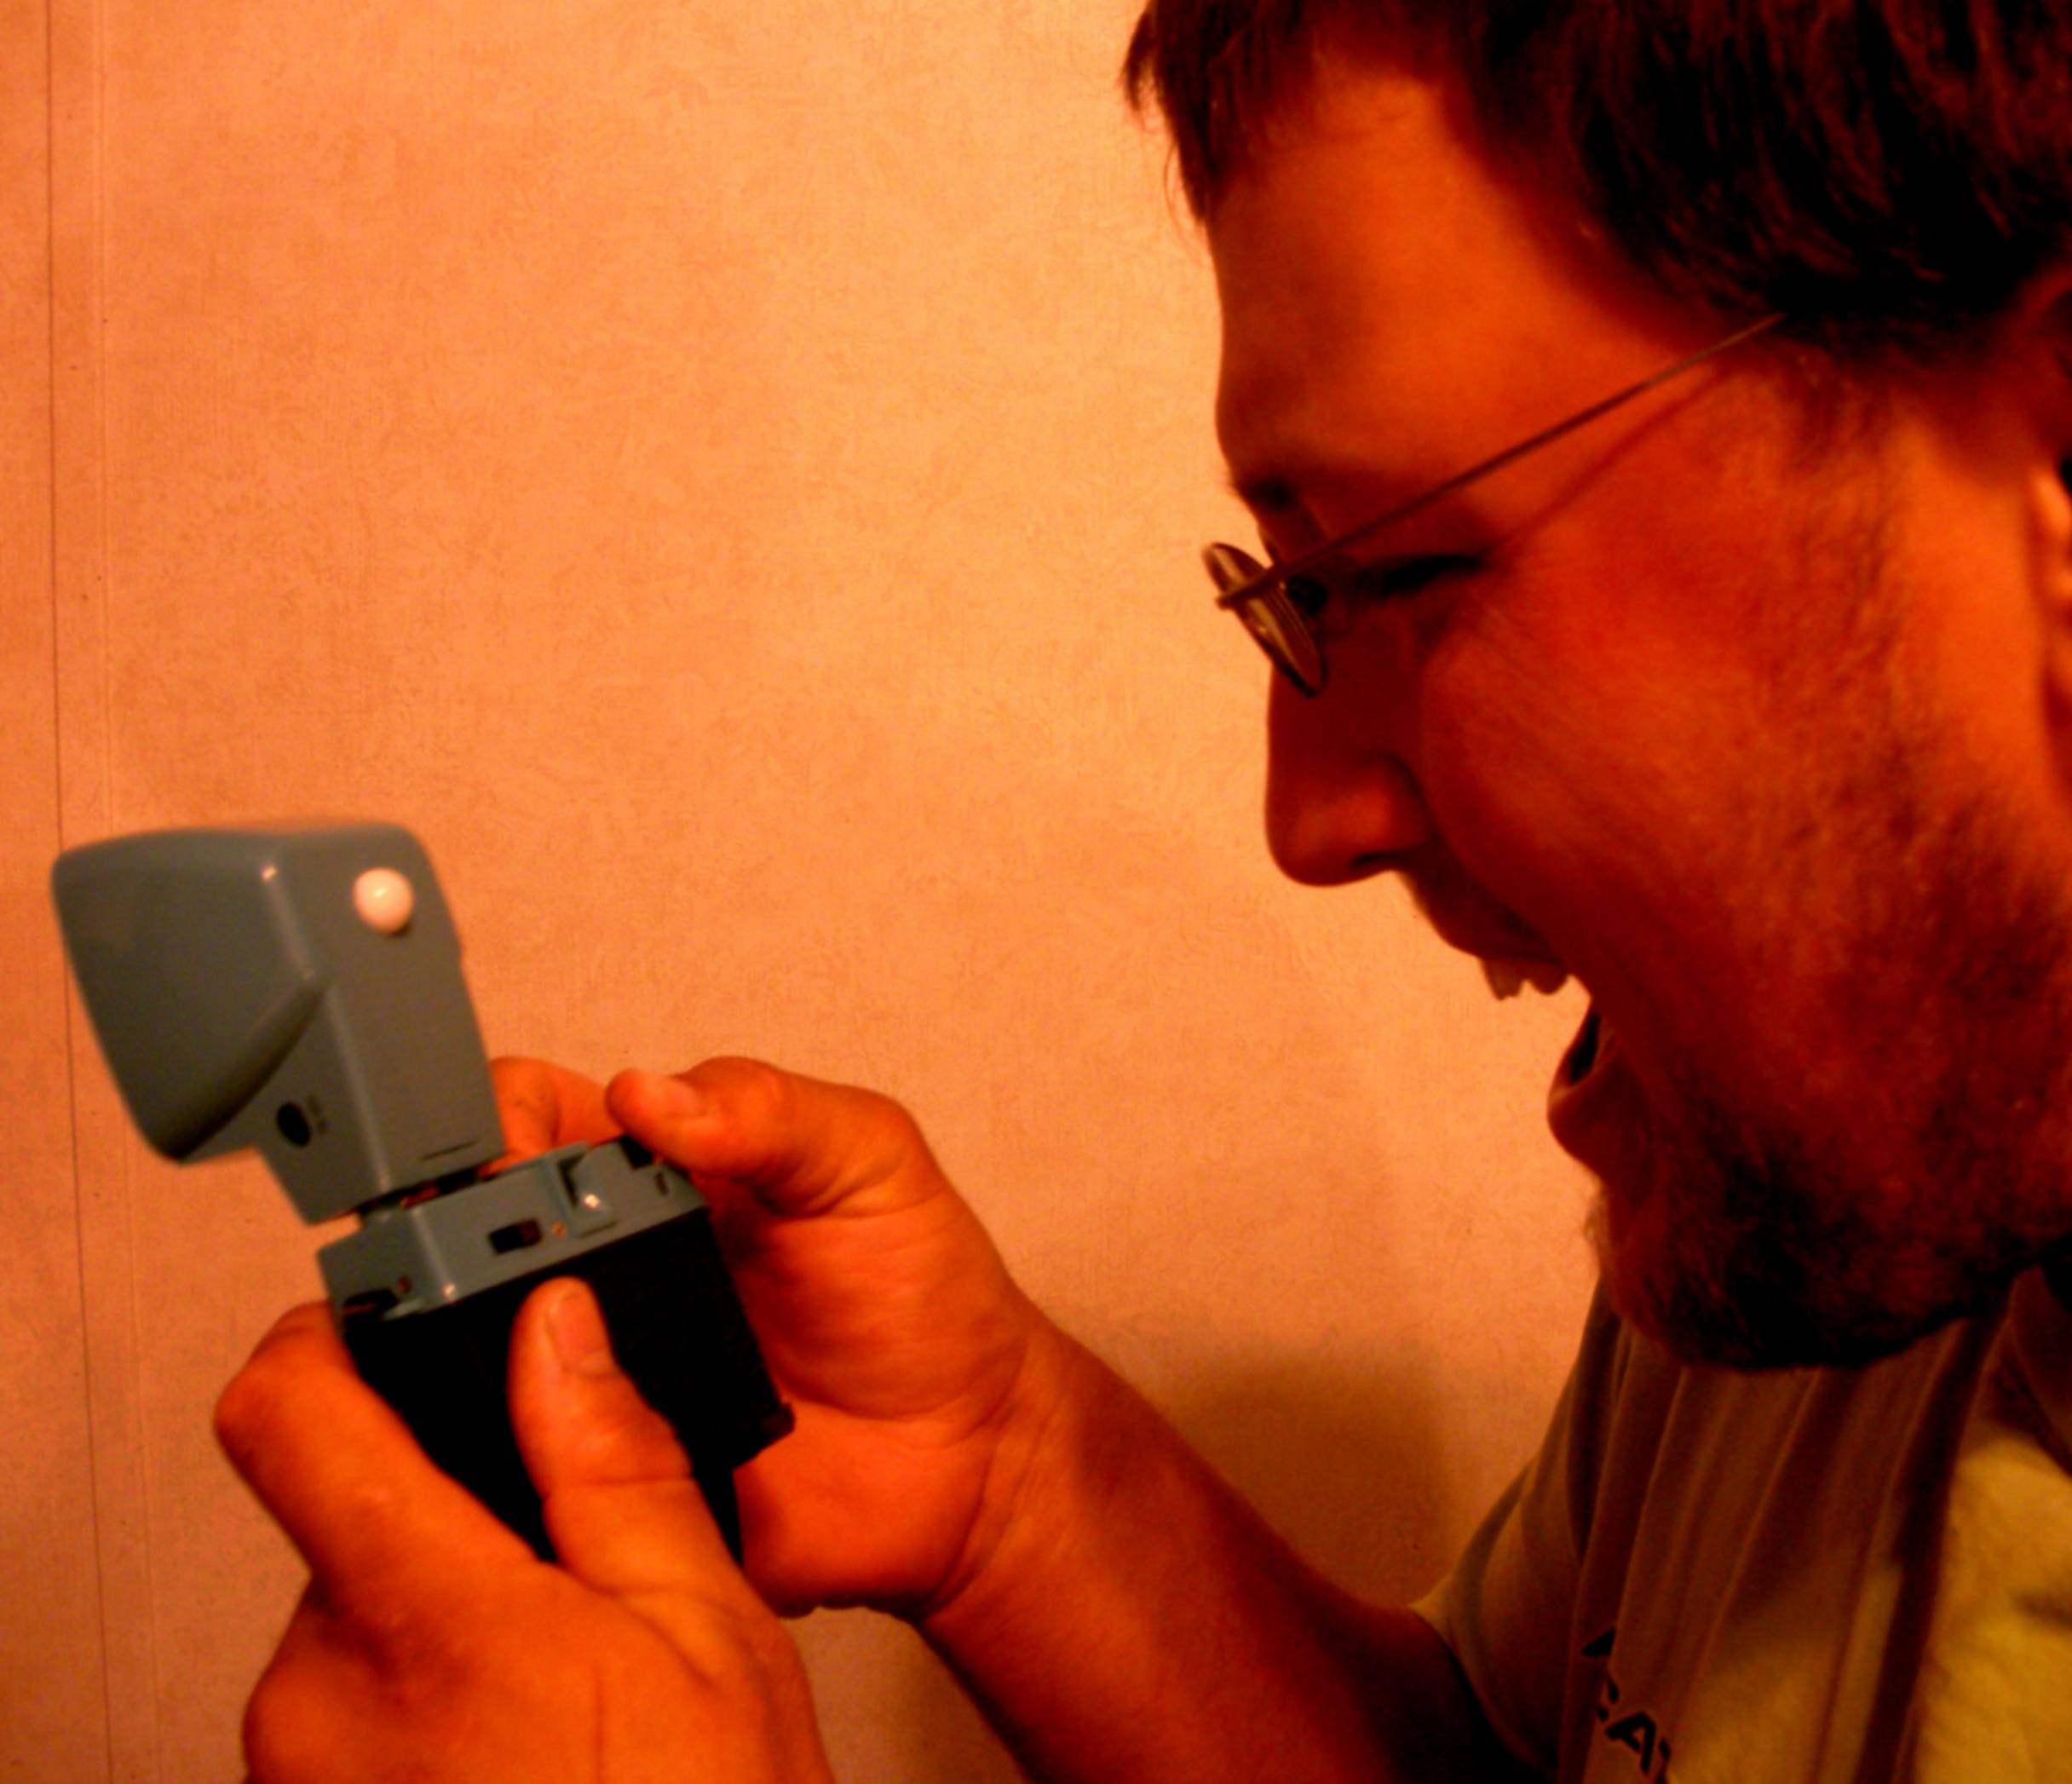
I brought my Diana Mini and four rolls of film to my best friends wedding. I was upset when every roll of film would stop at picture 15 and would not advance anymore. The advance knob would get stuck or it would not advance fully. I searched for answers but all I found were other people that were having the same problems. I love my Diana Mini and I wasn't gonna let this problem slow me down.

The Diana Mini, being a fully mechanically camera, means that there are not any electronics. Advancing the film and taking a picture is a very simple process within the camera. I figured out exactly what the problem was and I want to share it with all my Lomography Brothers and Sisters. The notes for each photo will be below the picture itself. Also, this repair can be done with film in the camera because you only need to remove the blue top. But if you do, the film counter will not be at the right number, until you reset it when you remove the exposed film like usual.

Let's get it on!

Be careful. There will be many small parts, sharp objects, and things that can go wrong. The Diana Mini is made of plastic all throughout the camera and plastic is fragile. This is an easy repair but if you don't feel like you can do this, don't do it. Find a friend that is handy with fixing things, buy them lunch, then ask for their help. :D Only you will be held responsible if you mess up your camera. Read through the entire procedure before you begin the repair.

Materials

First, you would need to prepare the tools you will need.

  • A: Container lids or anything you can put small screws and springs into without losing them
  • B: Tweezers for removing and installing springs
  • C: Something that blows clean air. This will help keep everything clean.
  • D: A very sharp (NEW) razor blade.
  • E: A small Philips screwdriver, flat head screwdriver
  • Optional: small washer-Keep reading

Fixing the Film Advance

Remove all three of these screws. 1 on the back, on the left, and on the right.

The top of the Diana Mini is latched just below the viewfinder in the front. Stick a flat head screwdriver between the top and bottom and pry up very carefully at this spot. Don't worry about the format switch on the back, it is not attached to the bottom, it just kinda hangs there with the top.

Now the top is removed and you are almost to the main part. The Film Advance counter has already been removed in this picture. Time to remove the gear cover.

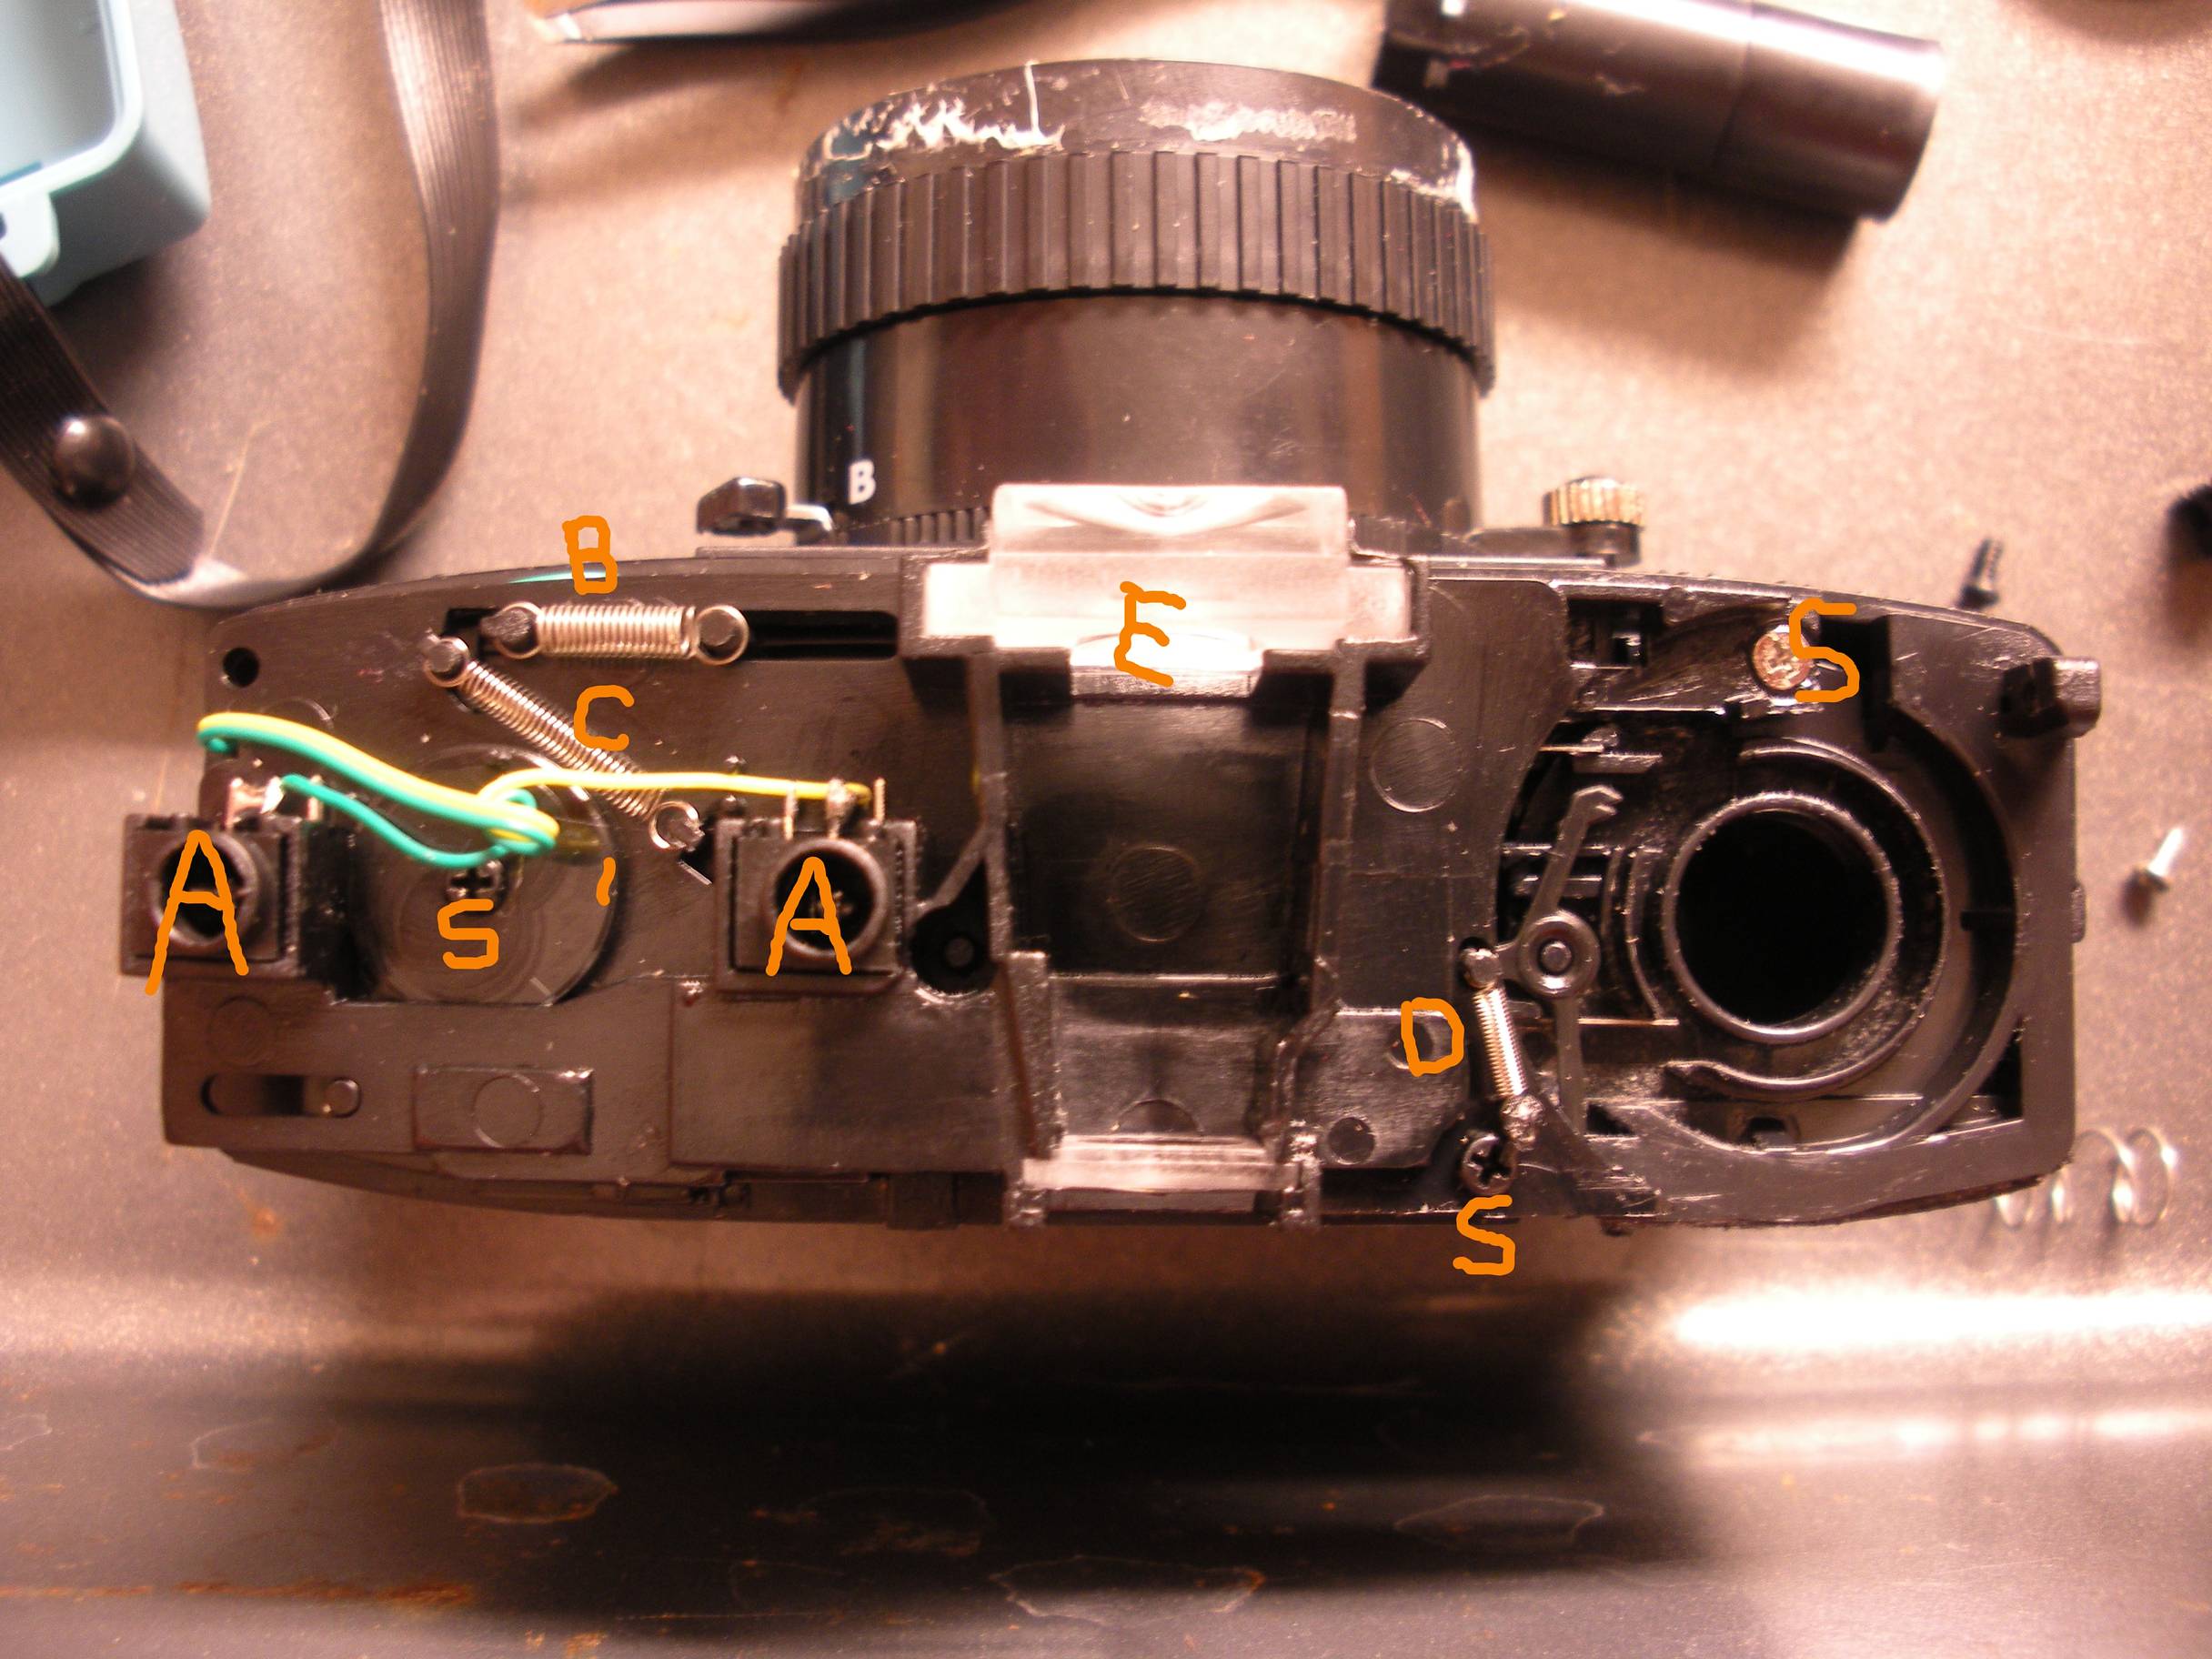
  • A: This is the contacts for the flash. When the gear cover is removed this will stay attached to the cover and the cover will hang to the side. Be careful because these are very small and delicate wires.
  • B: Big fat spring.
  • C: Long skinny spring
  • D: Short skinny spring.
  • E: Front viewfinder glass, there are 2 plates that sit in this slot that will fall out, so don't lose them
  • S: 3 Screws you need to remove

Remove Springs B and C with tweezers. DO NOT remove spring D. It can stay in place during the repair. Remove the 3 screws, the gear cover should come off now. Just lay it to the side and be careful not to break the flash wires.

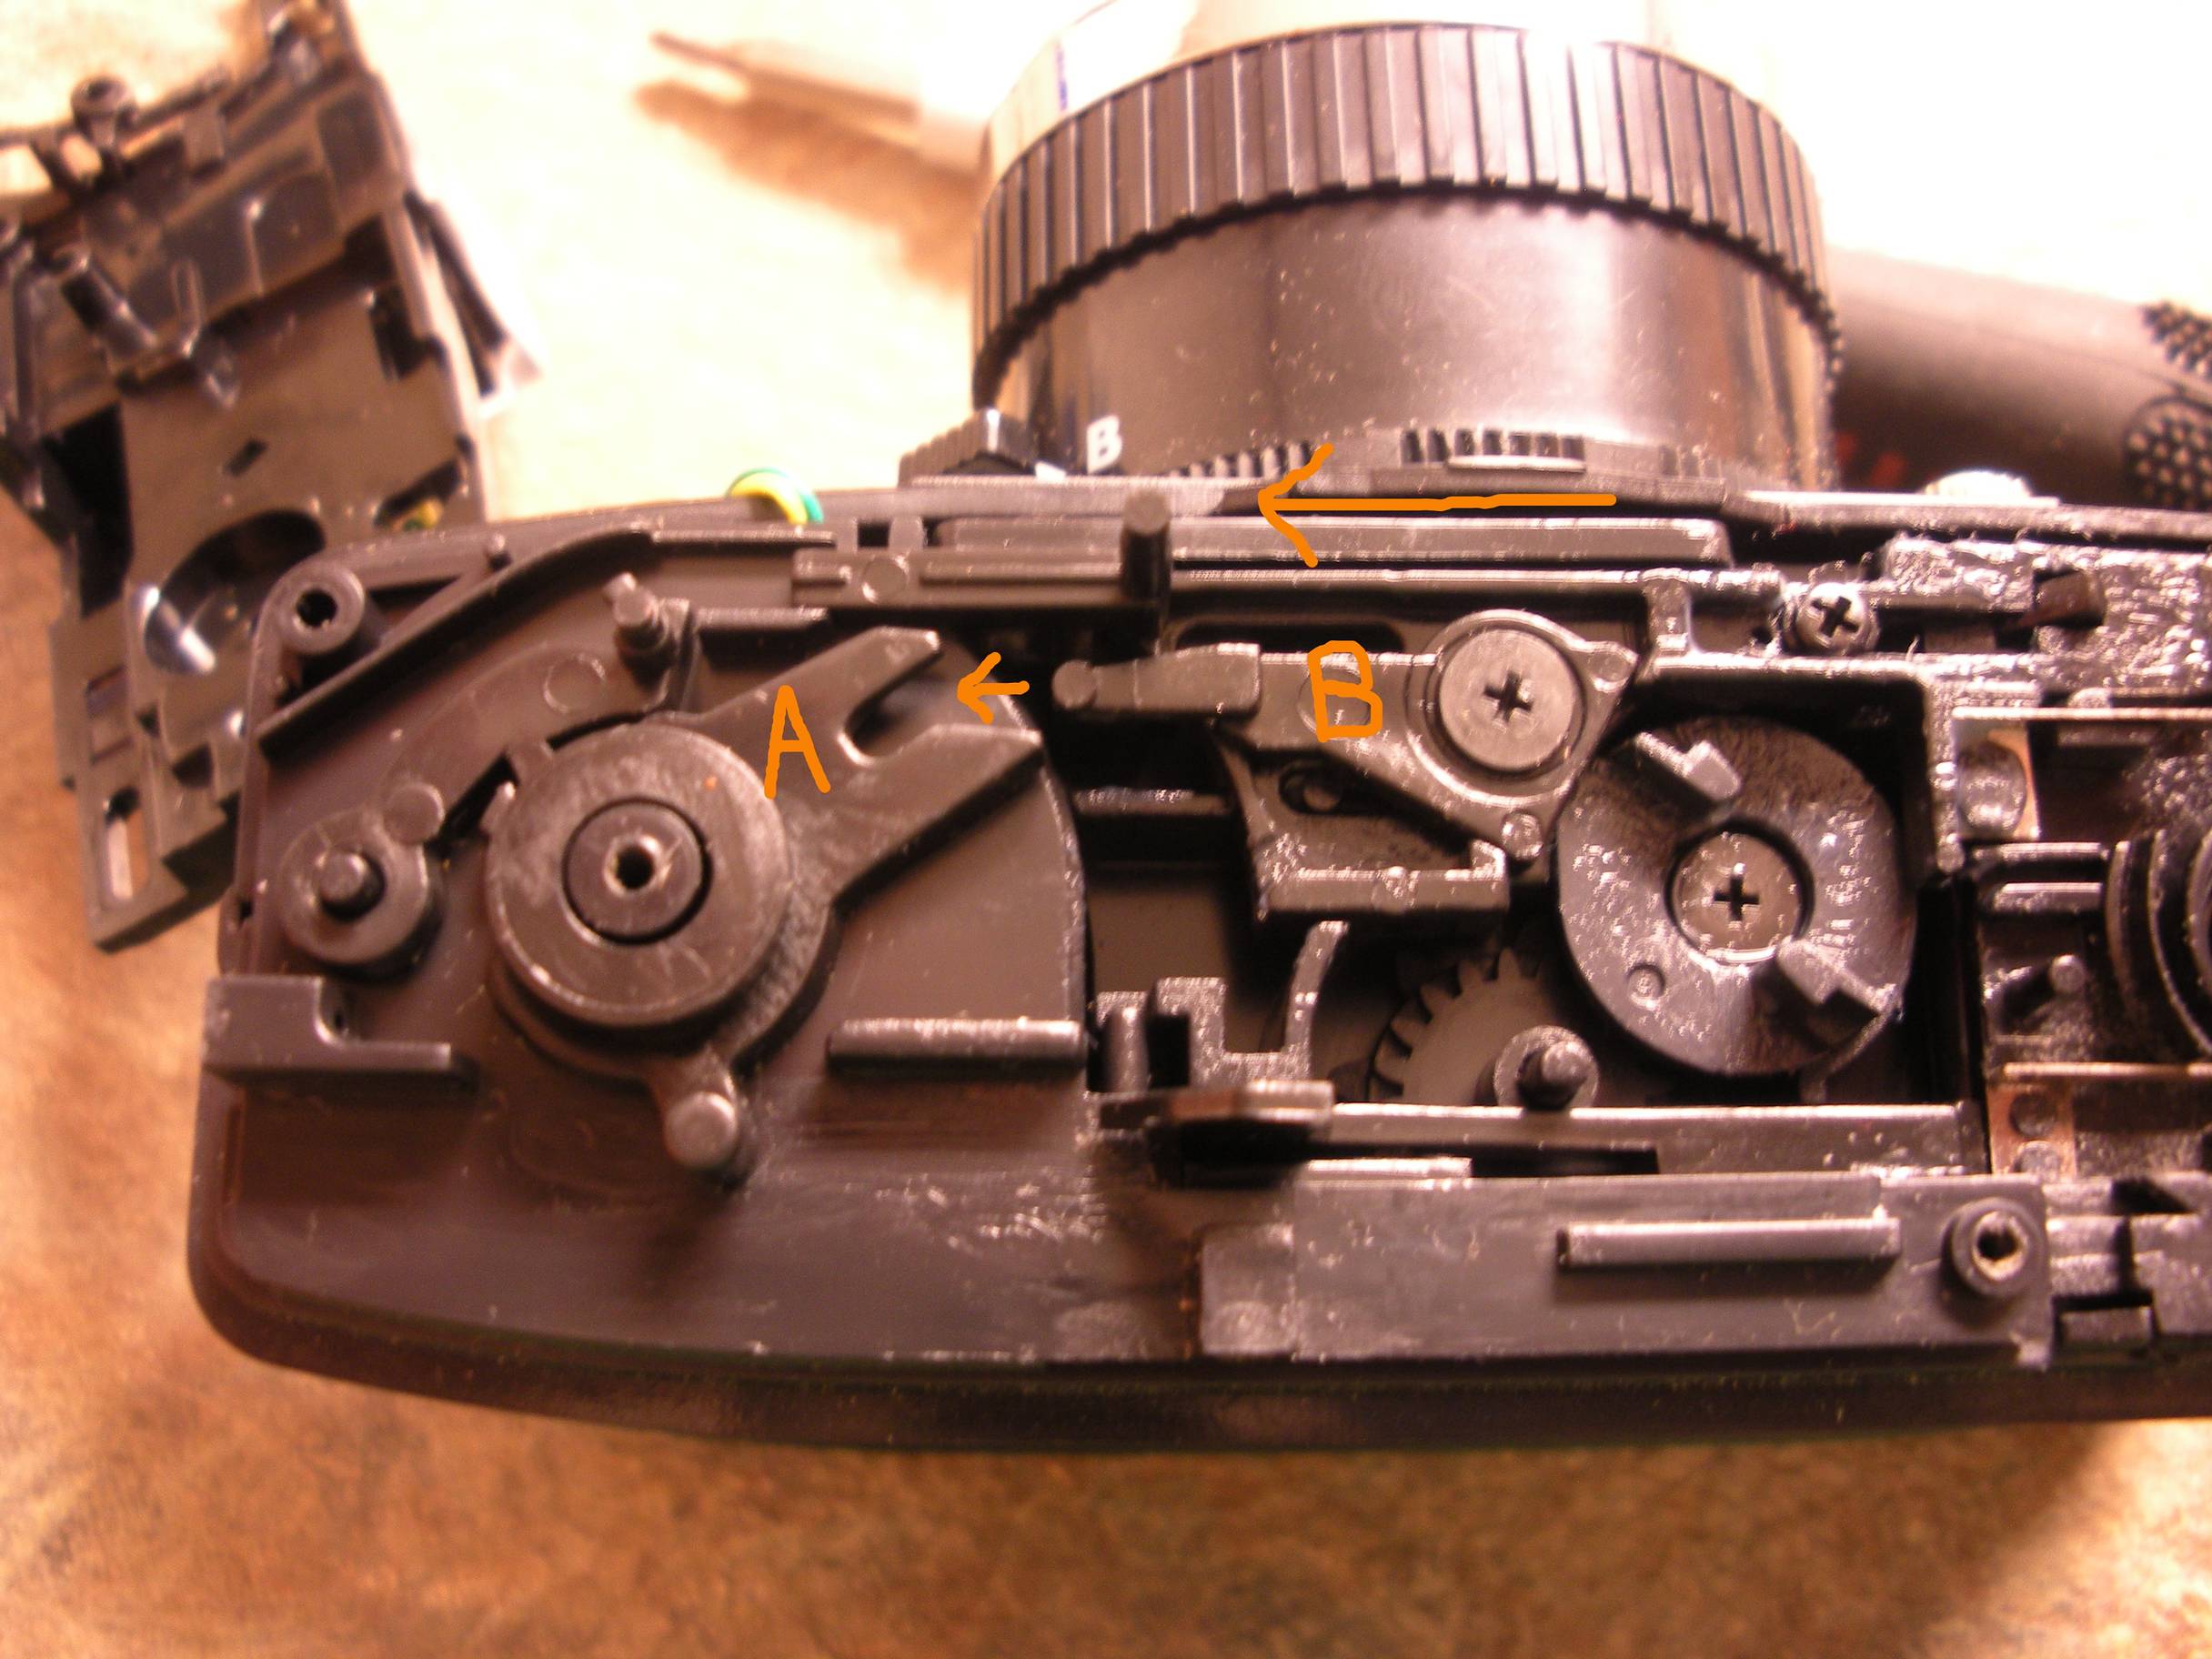
Here is what you will see. I will give a quick rundown on how this works. In this picture, the film is fully advanced. The shaft that the arrow is pointing to moves left when the shutter is fired, and right when the film is advanced. A is the cam that gets turned when you switch from square format to half frame format and vice versa. Right now A is in square frame mode. B is also in square frame mode. When the shutter is fired B will move to the left and should fit into the slot in B.

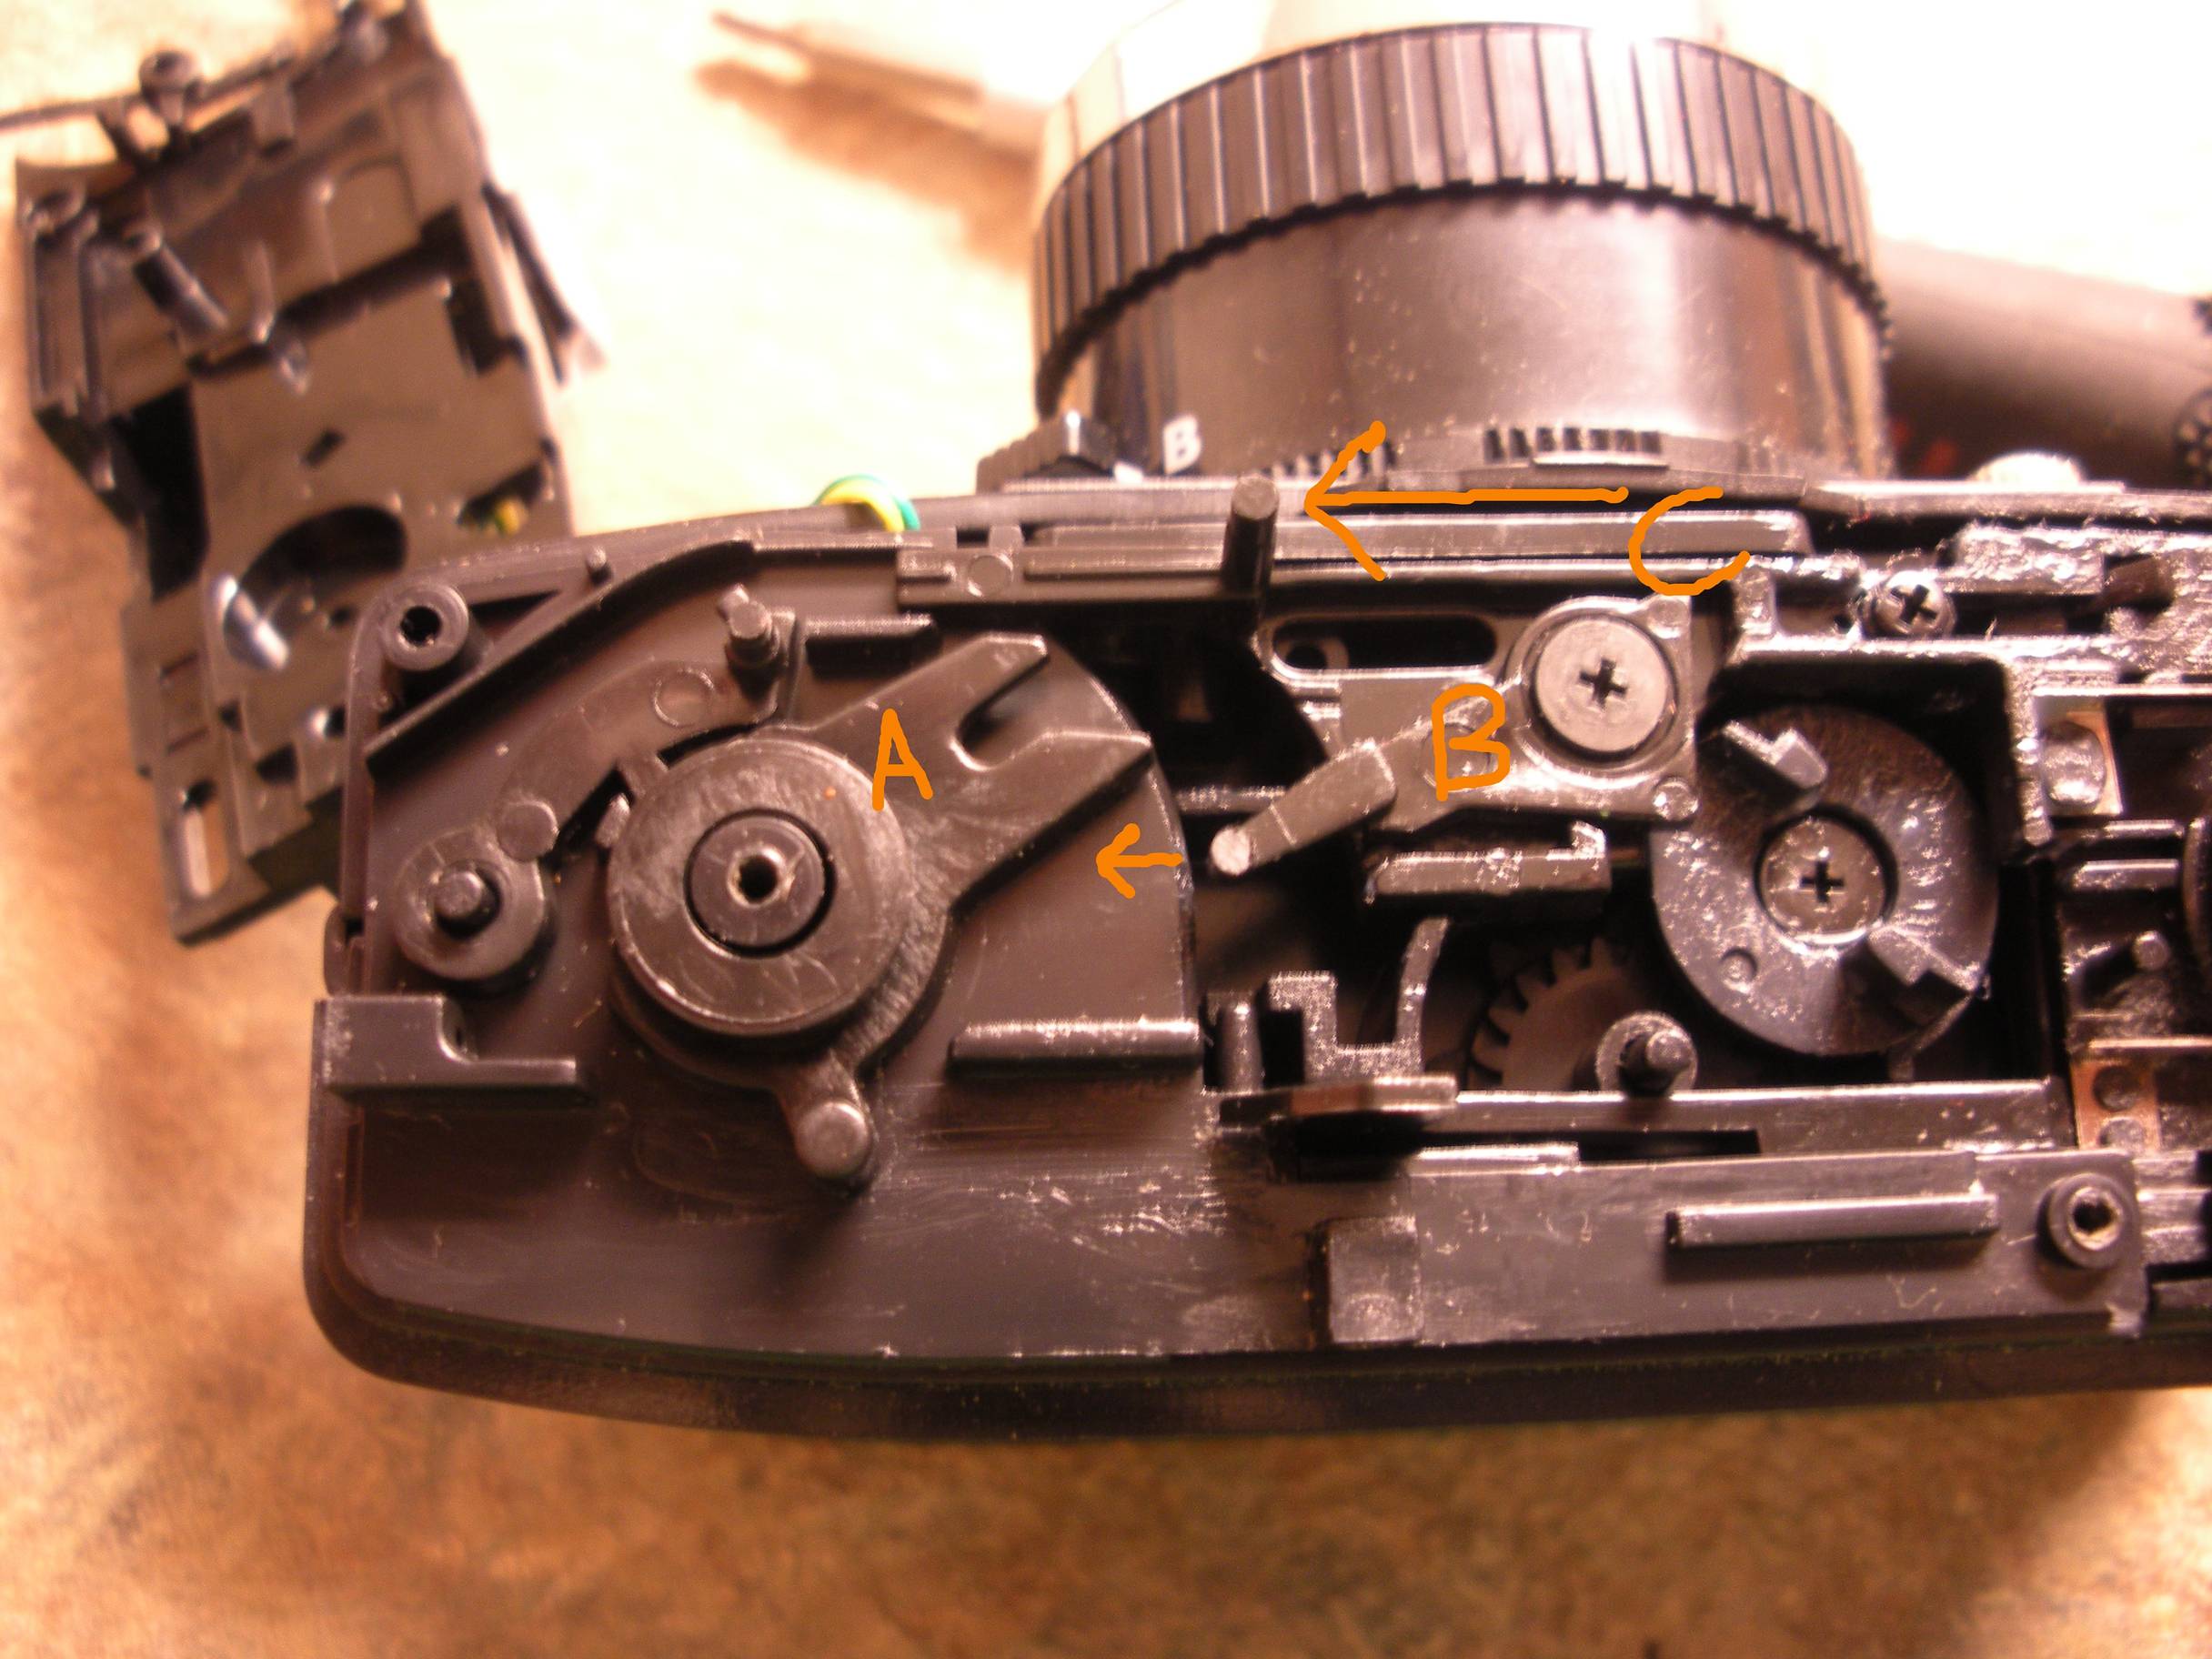
Here's another problematic scenario you might encounter with your Diana Mini's Film Advance: You just took a picture. You advance the film, then put the camera in your bag. Your bag will be carried around to many places, restaurant, vehicles, work, school, bathrooms, etc. OK, so here is what happens inside the Diana Mini that makes the film advance get stuck. B lever is held on by a screw, but, the screw does not hold tension on the lever. As you can tell by moving B lever, it can easily just flop around after the film is advanced. While it is in your bag, it got bumped and the B lever fell out of place.

Here is what is happening in the picture. A is in square frame mode, but B is in half-frame mode. when you fire the shutter, B will move to the left. Instead of lining up properly with the slot in A, B will get stuck under it. Now when you try to advance the film, it will get stuck, and possibly tearing the film if you try to force it.

Okay, let's fix this problem right now. We need to Stop the B lever from moving freely. Remove the screw the holds B in place. Remove the B lever. Now, you have 2 options here.

Option 1: Find a very small washer that will fit onto the screw. install the lever and put the washer between the lever and the screw. Screw in the screw until the B lever is tight enough, not to flop around. It will not take much.

Option 2: X marks the spot. This is where the screw goes. If you can take the razor blade and trim a very very very small amount of plastic off the top of this ridge where the screw goes. Go slow and remove a very little amount. Be careful not to apply too much pressure or you could break something. Now install the lever and tighten the screw until the lever no longer flops around. It should be tight enough so that is will take a little more pressure than before to move it. Don't tighten it so much that it won't move though. If it is not tight enough, shave some more off and try again.

Now clean all the shavings from the camera, blow everything will air to clean it out.

Line up the B lever so that it will be lined up with the slot at A.

Put the gear cover back on. Install the screws and springs in the correct locations. Blow everything off again to keep everything clean. Remember:

  • B: big fat spring
  • C: long skinny spring

This is where the film counter in installed. It can be kind of tricky. It may take 3 or 4 times but you will get it. X is where the tab on the spring at the bottom of the counter wheel will be inserted. you will see a slot at X. Insert the tab on the spring at X, and carefully wind the counter 1/2 a turn clockwise. Z is where the film counter window is at. If you have the back of the Diana Mini removed the counter will stay in place, sort of. Hold your finger on the counter to keep it from spinning out of place. Install the film format button into the blue top of the Diana Mini. There is a slot in the button and the slot should face down toward the bottom part of the camera. Keep holding the film counter in place and try to install the top without letting it spin out of place. It may take a few tries. Install the 3 screws that hold the top on. Now you are done, maybe.

Install a roll of film into the camera. Look at the film counter, it should be on E. If not, fire the shutter with the back removed. Keep the Cap on the lens and fire a shot. Advance the film. Fire a shot, Advance the film. Keep doing this until you reach the end of the roll. The film should advance fully every time and the film counter should move forward after each film advance. If the film advance still gets stuck, you probably did something wrong. Take it apart again and make sure everything is lined up right. If your film counter does not advance with the film, the spring popped out during the blue top installation. Remove the top and do it again.

That is it. Now you are done. You now need to show your Diana Mini some much-needed love. Go enjoy your Diana Mini because you have earned it. I hope I was able to help you. If you have any questions or suggestions feel free to drop me a line.

If you love your Diana Mini as much as I do, Let me know about it. Post your comments here. :D


This article was written by Community Member gnarlyleech.

written by gnarlyleech on 2010-08-05 #gear #tutorials #tutorial #repair #tipster #fix #help #how-to #diana-mini #advance #camera-modification #sticking-film #not-broke #diana-mini-top-tipster

Lomography Diana Mini & Flash Half-frame & Square Camera

The Diana Mini shoots 35 mm film and produces dreamy, lo-fi shots. The camera lets you choose between half-frame and square frame shots. It also features a Bulb mode function which allows you to take long exposures and crazy light streaks!

100 Comments

  1. vgzalez
    vgzalez ·

    amazing. I have no words. great. superb. professional. fun. love it!!!!

  2. rexhibitionist
    rexhibitionist ·

    We shouldn't have to do repairs on a camera that costs us $70 to buy. Just got the white one and already figuring out if I'm to return it or try to fix it after only two rolls of film.

  3. gnarlyleech
    gnarlyleech ·

    @rexhibitionist I understand how you feel, trust me. The same thing happened to me. All in all it is a fun little camera. But "nothing is perfect" and this holds true in the world of plastic. It is physically such a small imperfection, but it affects the whole operation of the camera. I made this tutorial to help people like me and you. I figured, instead of shipping it off to lomography, and being without my camera for a few weeks, and possibly getting a new camera with the same problem, I would fix it myself. I sent Lomography an email about this problem and how to fix it and I am sure they are going to fix this problem at the diana mini plant facility. I have faith in them. Lomography has always been a company that was built with the help of its members and they love suggestions.

  4. paramir
    paramir ·

    just did it, quite an easy fix indeed! great instructions, thank you for that!

  5. eskimofriend
    eskimofriend ·

    I love you!!
    still scared to do this, I had to have my diana mini replaced via warranty so I could be ruining a brandnew one (I'm very clumsy)
    but I used to have the same problem before something else on it broke.
    your instructions are really amazing lomography should give you a bag full of piggies for this!!

    (now since you're such a genius, could you maybe put the old lc-a and the new lc-a+ together so that we can have all the features of both models??)

  6. gnarlyleech
    gnarlyleech ·

    @Nancy , when you have finished a roll, rewind the film, then remove the back. The counter will stay at 36. With the back removed, fire the shutter. BOOM!! It should return to zero. If not, the counter spring may have come loose. I have a picture above of how to install it.

  7. fash_on
    fash_on ·

    wow, that is impressive, but seems too scary for me to try, I'll buy a mini after the factory modification.

  8. jihan_cessar
    jihan_cessar ·

    Splendid!! But, I have few questions I'd like to ask.
    First, does this tutorial only work for Diana Mini? Could Diana have the same problem like the Mini one? 'cause mine is Diana,sir! Thank you! :D

  9. wuxiong
    wuxiong ·

    Thank you for the wonderful instruction, although I donn't have the same problem yet with my mini, so far.

  10. earlybird
    earlybird ·

    Nice!!

  11. gnarlyleech
    gnarlyleech ·

    @jihan_cessar Yes this only works for the diana mini. The problem has to do with being able to switch formats and the diana f does not have that ability built in.

  12. tallgrrlrocks
    tallgrrlrocks ·

    Congrats dude! Nice to see this published :) I am bookmarking this so I can refer to it if I experience some 'Mini troubles (mine came in the mail 3 days ago!). Oh, I like the "frustrated" pic for the intro! Nice touch! :D

  13. dogma
    dogma ·

    Great job! i all so love to fix camares by my own :)

  14. philippe_machado
    philippe_machado ·

    Great tutorial!
    Is it right to think that this problem will no appear if you only advance the film before shoot?
    Because the problem is happening during the transportation when the camera is ready to take the picture.

  15. gnarlyleech
    gnarlyleech ·

    @philippe_machado That is correct. If you can take a picture, and then not advance the film until you are ready to take another one, it would help with this film advance problem. I had thought about that and the reason I did the modification is because I have a habit of advancing the film after every shot.

  16. panelomo
    panelomo ·

    good job @gnarlyleech - though i'm not sure if i'm ready to operate my diana mini yet. :)

  17. gnarlyleech
    gnarlyleech ·

    @Georgia Remove the top and see what is going on. Check out my pictures at the top to see how it is suppose to work. It is probably out of sync with the lever. There is a lever all the way to the left in the 8th picture. this lever is held by spring tension to keep the format from changing after the film is fully advanced. after the shutter is fired, the lever moves out of the way to allow format changes. Your problem probably lies here somewhere. Let me know if you need some help.

  18. mefias
    mefias ·

    realy good article thanks from Germany and I LOOOOOOOOOOOOOOOVE my Diana Mini-she is great at school and me and my friends have a lot of fun with her.

  19. yarah
    yarah ·

    Thanks a lot! I will bookmark it, have the same problem and found an other way to continue... Go to the toilet, or other dark place, remove the back, advance a little, put it back on and it works again.

  20. electrofairy
    electrofairy ·

    thanks so much for this tutorial. i bookmarked it when i found it a few days ago. "just in case.." i thought. so, here i am 3 days later with my diana mini not winding anymore. will be brave and try it later since my camera is just a few months old.

  21. waltersans
    waltersans ·

    I tried with sweaty hand..and YES..your guideline was very good to follow and my diana-mini is back together without parts or screws left on the table.. thanks very much..i transported two rolls without any problem :))) Make this guy head of R&D at lomo !! :-)

  22. waltersans
    waltersans ·

    I tried with sweaty hand..and YES..your guideline was very good to follow and my diana-mini is back together without parts or screws left on the table.. thanks very much..i transported two rolls without any problem :))) Make this guy head of R&D at lomo !! :-)

  23. waltersans
    waltersans ·

    I tried with sweaty hand..and YES..your guideline was very good to follow and my diana-mini is back together without parts or screws left on the table.. thanks very much..i transported two rolls without any problem :))) Make this guy head of R&D at lomo !! :-)

  24. gnarlyleech
    gnarlyleech ·

    Thanks for the nice comments @waltersans. I am glad I was able to help you. If I find anything else out I will let everyone know. I agree that I should get some compensation for my hard work. Maybe like 1000 piggies. lol. I wish.

  25. joe123
    joe123 ·

    I just wanted to let you know that I did it and it worked great. Thanks

  26. alearly
    alearly ·

    I did everything as instructed and the advance problems all seem to be fixed. I have one issue though that I can't fix. When I install the counter, I insert the tab at X, turn it half a turn clockwise and hold it in place. It doesn't spin out when I put on the blue top. However, it doesn't go back to E at all. When I do the half turn, the counter shows 72-75. When I take off the back or fire a shot to reset it, it snaps back to 33-36, not to E. The tab itself is placed around the 75 mark. Any suggestions?

  27. gnarlyleech
    gnarlyleech ·

    You still aren't turning it enough. turn it another 1/4 turn to make a total of 3/4 of a turn and you should be ok. you should be past E in the sight glass when you put the top back on. let me know if that helps.

  28. mochilis
    mochilis ·

    What a great article!!! I read it a while ago, but I never thought I would be having this kind of problems with my Diana Mini. My problem is that when I'm loading the film it gets stuck and the sprockets break, so I can't use it, not even to the 15th pic. I'll try this "surgery" to see what's going on inside the camera and have it back at work asap. Thank you very much!!!!!!

  29. eyes
    eyes ·

    I'm attempting this right now, what do you mean by "washer"?

  30. gnarlyleech
    gnarlyleech ·

    @eyes here is a link for you. try a hardware store if you want to go this route en.wikipedia.org/wiki/Washer_%28hardware%29

  31. eyes
    eyes ·

    Thank you sir :) now if only I could get this stubborn screw off!

  32. beni
    beni ·

    great article!! big help for us. my respect

  33. saks
    saks ·

    worked perfectly. thanks!

  34. picadillette
    picadillette ·

    I took it apart and shaved off some of plastic and I'm not having any problems with film advancing, but the last roll I shot had a lot of chopped off heads, whereas the first one (pre-fix) didn't. Is it possible that I screwed something up internally or is it most likely just user error?

    Thanks for the guide, nonetheless! It was great fun to take it apart and see how it worked while also having pictures to show me how to put it back together correctly.

  35. gnarlyleech
    gnarlyleech ·

    I did this too on a whole roll of film. All rangefinder cameras suffer from parallax. The lens sits lower than the viewfinder, so the picture may look right through the viewfinder, but the lense is not lined up correctly. This is not a problem when you are shooting objects far away, but can mess up pictures of objects up close. The best thing to do is to remember that when you are taking close up pictures and correct for it.

  36. somekindofwonderful
    somekindofwonderful ·

    wooh I've just done this with only my nail scissors and tweezers, was cool to see how everything works!
    but you know the top bit, the counter slipped when i was screwing it on and now the top wont come off and I cant get to the counter spinny bit to adjust it! like, the thing that shows the number of photos left so now the stick below it that twists the film wont turn either which is annoying.

    any tips on how to get out this stupid screw? xx
    great tutorial btw, even an amuteur like myself could follow it :D

  37. dedee
    dedee ·

    thanks 4 that article, yesterday i fixed my Diana Mini with your help! In the next few days i will see how it works in reality... greatings from berlin

  38. gnarlyleech
    gnarlyleech ·

    I am glad I could help. Let me know if you need anything else.

  39. chevaras
    chevaras ·

    I tried fixing mine with this guide, at the end I lost the Big fat spring :(, it sprung out of my big hands in to oblivion. Now my lady Desiree sits in the closet, for ever alone.
    anyway i can find a spare spring? i cant bring my self to spend some 50-60 bucks because of a spring. =/ i miss my lady.

  40. rdp_ribeirense
    rdp_ribeirense ·

    amazing!

  41. ssiidd
    ssiidd ·

    help help help!

    i was just removing the first spring, when i bumped the camera a little, and FAT spring came outta somewhere. just don't know where it came from!

  42. rdp_ribeirense
    rdp_ribeirense ·

    Just wanted to say @gnarlyleech that i've done it too (4 hours later) but i will contribute to a tip, I put in a washer a size too big thinking it would be ok. Of course the roof of the Blue Plastic has been moulded to fit the screw, so the washer was scrapping the top roof of the blue plastic cover. I only found this out after 4 hours of trying to find out why the sprocket wheel was tearing the film. It was the pressure from that washer! lol I resolved it by trimming the plastic off the ridge like you suggested! All good now! Thannkksss!!! :D

    @ssiid, study the 7th picture down and see the B spring, is it this one? You should only have 2 springs removed, try and compare your camera with the picture.

  43. gnarlyleech
    gnarlyleech ·

    @ssiidd, @rdp_ribeirense is correct about the springs location. It is the B spring he is referring to. Study the notes for that picture and you should be able to see.
    @rdp_ribeirense yeah I have never tried the washer fix, I just thought it would be possible. But I guess not. Lol. Glad everything turned out ok.

  44. ssiidd
    ssiidd ·

    @gnarlyleech I found where it goes. It was a large spring that goes onto the film advance spinner.

    One more question, is it possible to develop what pictures I have left (like 26) considering I did not do this repair?

  45. gnarlyleech
    gnarlyleech ·

    Yeah, as long as they weren't exposed to the light during the repair.

  46. ssiidd
    ssiidd ·

    so just rewind and remove? YAY!

  47. amyrose
    amyrose ·

    I have the same probelm except with my 35mm back for my Diana F+- it won't advance past 18. Should I try the surgery and see whats going on?

  48. pussylove
    pussylove ·

    Thanks soooooo much!!! I had same problem with my first Diana mini so... I bought a new one thinking something wrong, whatever.... Then same problem happened again and I am so so so glad to discover this article that I will do surgery tonit!
    Thanks!

  49. go1db3rg
    go1db3rg ·

    I tried this many many times and i was successful in every step except for the film advance, no matter how many times i put it on, it kept spinning out of place, and when it didn't, it just wouldn't advance at all, but would show the blank space between the 75 and the E. i followed the steps and everything but it just keeps spinning back to the 33-36 region

  50. marv89
    marv89 ·

    Thank you very much for this guide !
    Will try it after work, wish me luck :D

  51. kingnate
    kingnate ·

    I must not have done it correctly, my mini seems unhappy :(

  52. kristine
    kristine ·

    great work, but i hope i never have to do this. got lost half way through unscrewing 3rd screw

  53. johnprimmer
    johnprimmer ·

    This worked well for me! Only bought the camera last week and it broke the first film i used! A even posted how great this worked on my blog :)
    john-primmer.blogspot.com/2011/02/mini-diana.html

  54. mamankodok
    mamankodok ·

    hey . thx for the info . yes , i do love my diana mini much more than you do . haha (:

  55. alehopgm
    alehopgm ·

    Another way to fix Diana Mini film advance problems! www.lomography.com/homes/alehopgm/blog/2080-how-to-fix-your…

  56. softprops
    softprops ·

    whoa. amazing article. I'm totally doing this. thanks so much for posting about your tickerings.

  57. bryson
    bryson ·

    just did this! going to run a test on it tomorrow! :D

  58. chardma
    chardma ·

    please help!!!
    i took the blue top off and this bit fell out and i don't know where it goes.
    this bit i speak of is in the third last picture above the two screws.
    what do i do with it?

  59. foro
    foro ·

    ahhhhh this is so aweoms.e thanksso much for this.. hahah to all the noobs who cant follwo instructions, come on guys! theres not that many steps!!!!

  60. kamiraze
    kamiraze ·

    It seems that I have finally fixed my Diana Mini!! Thanks a billion!! great tutorial :D

  61. brittaniraealley
    brittaniraealley ·

    I have a question about this little gal - on my first role of film I put the setting to half frame. However when the pictures were developed on each 4x6 picture, instead of having a split picture, there was half of a picture on one side and the other half was black. Any ideas as to why it did this? I was advancing until the film became tight as in most cameras... should i only advance it half way?

    thoughts?

  62. chia06
    chia06 ·

    How can I repear my Mini Diana lens? The bulb function don´t work :(
    Help!
    Thank You!

  63. gnarlyleech
    gnarlyleech ·

    I have never taken the lense off. It is glued on and I am not sure what would have if you forced it off. Maybe you could be the first one to do it @chia06

  64. mijnheermoris
    mijnheermoris ·

    I'm not really sure if I have an advancing problem because my Diana Mini is just one week old and my first film is still at the lab. However, I took it out on Friday, took some pictures at my local pub but also drank one too many beers. Therefor I'm not sure if I had advancing problems or just drinking problems ;-) I will wait for the results of the lab to find out.

    But for now, great tutorial!! I was just wondering, do you scrape of the plastic on the whole surface where the screw is held? And what's the idea behind it? Does it make the screw go deeper into the hole or does it just make the surface more rough instead of maybe a bit slippery?

    Thanks a bunch! If I could I'ld give you piggy points!!

  65. binolatte
    binolatte ·

    Nice tip mate! Do you know how to access the shutter blades?

  66. explorette
    explorette ·

    thanks for the tip, i just got a mini off ebay and wasnt told it was messed up inside. sorted now i hope (will see if i shaved enough plastic off)

  67. saidseni
    saidseni ·

    Hi! Diana Mini will be my next camera because it's small and because I really like half-frame. But I have a question and I'm sure you know the answer - how do we know we advanced half frame and can shoot the next one? Is there any mark on the camera or we just have to guess? Thank you!

  68. wolkers
    wolkers ·

    Hey there! Thanks for your great work! My Diana Mini would advance film but endlessly. I followed your steps and found out, that wasn't the problem, but now I got it solved and well thanks to you! You saved my little Lady Di! Thanks a zillion!

  69. ngjinglingfiona
    ngjinglingfiona ·

    Million thanks for this tutorial! Much respect to you, the tutorial is pretty easy to follow and really really cool. I am going to restore my little Dee soon, thanks to you (:

  70. thejunkman
    thejunkman ·

    I can get it back together. Its like the rubix cube from hell.

  71. thejunkman
    thejunkman ·

    if I mail you my camera can you do this mod for me? I am about to throw it out the window and delete my lomography account and go back to digital photos.

  72. georgie_dianamini
    georgie_dianamini ·

    I have had my Diana mini now for over a year and this problem has only just cropped up, the flash works fine when not connected to the camera but when I do connect the flash and take a picture the flash doesn't go off. I've looked around but I've not seen any one complain of this problem. Help would be great, love my Diana and its flash x

  73. jfwolpert
    jfwolpert ·

    i cant get the counter to stay at e when i put the top back on....???

  74. lomolover16
    lomolover16 ·

    So this article fixed one of my problems...can anyone help with the other? I can't see to adjust the lens on my Dina mini. I managed to move it from infinity to .6 once. Now it seems to be stuck

  75. ms_simone
    ms_simone ·

    Hi @gnarlyleech - you are my savior! Or my Diana Mini's savior. My boyfriend is quite a handyman and is going to operate on my camera. I just know that your tutorial will fix her. Sadly, it's been two years since you've posted this and Lomo has not fixed the problem :(

  76. geocharlotte
    geocharlotte ·

    I got stucked at 15 and forced it so I probably tore the film, do I have to do the above procedures or I can just rewind it? My camera is just 2 weeks old :(

  77. itskristiee
    itskristiee ·

    I did the steps you did on my Diana Mini and for some reason after i take it apart it only lets me advance one shot and then gets stuck again:( am i doing something wrong?!?

  78. klaryssa
    klaryssa ·

    Oh my goodness thank you so much! I had just bought it and later found out about the film problem and had no clue what to do, but now I do!!:)

  79. litumai
    litumai ·

    amazing tutorial, finally my camera is working ptoperly!!!
    i havent been able to put the counter on its original place, but with the click counting tipster, theres no need to actually putting it to work! THANKS A LOT!!!

  80. daisymae
    daisymae ·

    Gonna have to try this - my brand new Diana mini jammed after just ONE shot, AND managed to destroy the sprockets on the film, even though I knew this was a risk and didn't force the film advance. So after 1 shot I have a broken camera and a broken film, and no joy from customer services. So I guess my only chance is to try this fix. Wish me luck.

  81. ikondave
    ikondave ·

    My brand new mini destroyed two rolls of film. I admire the creativity it took to figure out the repair, but seriously, the camera should have been made correctly in the first place. I'm returning mine.

  82. keerstieh
    keerstieh ·

    Hi, I'm having the same problem, but then the other way around.
    The B lever is kind off stuck? And the A moves freely, but can't move the B, because it's stuck. The 'legs' from A can't reach the 'leg' from B, so I don't know if it's possible to fix this anyway..
    Do you know how I can fix this? I just got my diana mini for a week now and it destroyed my first two rolls of film.. :(

  83. cruciothelights
    cruciothelights ·

    I am having trouble loading my diana mini. I follow all of the instructions correctly to try and load the film but every time I try the counter doesn't move and if I try and advance the film, the sprocket holes on the film rip. Do you think this "fix" will help my issue? I haven't even used it yet.

  84. edis
    edis ·

    While reassembling counter, I found unmentioned in original instructions to watch for the small dent on the turning wheel - it would stop from turning exactly half turn (there is mark on the top, that goes right to the opposite side with proper turn). Had to ensure, that this dent skipped past Z dent on the body, this is correct positioning. Next important player in the counter advance game is small triangle on the top of the back - it will slide necessary lever left, when back is firmly closed. Had some trouble while loading film, needed to hold film onto taking axis tighter, and watch for proper alignment of perforations in both transport ant that axis. Now film seems to wind and count properly. Good luck, and don't forget there is warranty for new cameras, would you need it badly.

  85. betonos
    betonos ·

    I tried the "pro" solution - putting washer under that screw. A world of warning: with washer this screw gets lifted and shutter mechanism starts jamming. I've tried additional washers under other screws to lift everything up but it also caused other problems. Eventually I've done it tye exact way author did it, and gor everything working. Took me around 10 tries altogethre :) just skip the washer idea, it doesn't work :)

  86. rhizome
    rhizome ·

    gnarlyleech said to Aleary:

    "You still aren't turning it enough. turn it another 1/4 turn to make a total of 3/4 of a turn and you should be ok. you should be past E in the sight glass when you put the top back on. let me know if that helps."

    But it's not possible to turn the advance another 1/4 turn! Any other suggestions for getting the advance counter properly aligned? The rest of the instructions are simple compared to this final one.

  87. georgiaolive
    georgiaolive ·

    I just bough a diana mini from another person who left a roll inside, I didn't know about the roll so I forced the advance wheel and tore the film by accident. I hope I didn't break the sprockets :~~ I wish I knew about this problem before going for a mini.. oh well, time to test!

  88. georgiaolive
    georgiaolive ·

    So, as I'm trying to load a film, this happens: i.imgur.com/MuDdGlV.jpg
    the film just wont roll properly, and eventually gets jammed :~~
    I kept advancing the film a little bit more until i could make sure the film was rolling itself. After the first shot, I started turning the wheel and the counter popped to 3 right away. Took one more shot, and it seemed like the counter wasnt going to move, then it popped forward.. the advance wheel is easy to turn, so far it's not jamming, which is a relief! I'm not going to advance the film until I'm ready to shoot again (following tips!).
    Cant wait to see the results! I'll post my pictures here eventually :)

  89. kyrafay
    kyrafay ·

    My poor baby Diana just decided to stop advancing completely. Will this repair fix that??

  90. rebeccacote
    rebeccacote ·

    Here;s my issues. I have successfully done all the steps for my diana (and found pieces of old film that was torn up inside of it) but how the hell did you managed to get the top back on over the frame switch while keeping your hand on the fil, counter? this seems impossible to me.

  91. rebeccacote
    rebeccacote ·

    Also I got everything else back in place and put the blue cover on (figured out the frame switch) but the film advance is no where near the E and none of the suggestions are working. I am concerned my camera has been permanently damaged by this fix even though i followed everything exactly as written. I cannot do a 3/4 to put in closer to the E as the gears will no allow me to, I tried to take a photo with the back off which also did nothing. I am stumped.

  92. jennapitpit
    jennapitpit ·

    @gnarlyleech my boyfriend is helping me with this, we have taken the back off, sorted the problem (hopefully), but we are now struggling to get the back on keeping the counter at E, it keeps spinning round. We spent last night and this morning trying and are out of ideas. Please help!

  93. awphoto
    awphoto ·

    So this thread is pretty old... did Diana ever attempt to fix this problem? I just got my Mini, and I love her. Well, I want to lover her. I got 3 frames in and ripped my film in half! I will try this but not sure if this is what is going on since this tut was made 4 years ago.

  94. mchl
    mchl ·

    this is amazing. works great! thank you so much.

  95. edis
    edis ·

    I wouldn't say issues with Mini were ever actually addressed :-) Last replacement was leaking light, green triangle + distorted focus, sometimes really nice, but when most of exposures are such, oh well. Tearing film is another pain - happened most often past 20th shot. And now I have bought third one with sticking shutter and stuck format change switch from disappointed guy. Happy to report, that problems appear to be more sorted, than not after couple of hours. Until it tears another film or sticks shutter...

    Here goes more detail how to deal with the counter, when assembling back. You certainly pay attention first to restore lever, actuated by spring marked as D. This is for sensing back is on, for counting at all to occur. Just gets into place, easy one. Then you deal with the L shaped end of the spring on counter ring - as per instructions above, it has to slide into X and hook there fully and naturally. I needed sharp tool to help lower it, as spring tended to position itself higher, than protrusion. When helped, there was no free space between that L tail and body. Time to wind ring clockwise, so introducing tension to the spring. When you make half turn and hole in the counter top is facing your side, you feel it can't turn any further. And this is where you lift your side of the ring gently, and help it to just pass that stopper point, lower back when past that. The spring is now with accumulated tension, held so by the stopper, from behind it, this is exactly what you need. This state is not very stable however, thus your finger on ring will be keeping it before top returns back. I keep frame format switch inserted in its protrusion of the top, holding it so angled, that switch would not fall out. Of course, horizontal position has to match sliding detail, it switches. This (back) side is put on first, front will follow. Click of the cap, and basic testing of assembly is now possible before final screws.
    It is somewhat complicated to test counter operation without film, but is possible, minding cover sensor and manual sprocket advancement. Another note - there is no screw, as is seen in the pictures, at front left corner of the top - even though hole for the screw is there. The problem camera had it in there, which I think could have been one source of the problems. Also attention to the path of the flash wire, pictured. Good luck with this funny anyway creature.

  96. athanasiad
    athanasiad ·

    Hello, I followed the instructions and "fixed" my diana mini. However, I had problems with the new film as well. The advance wheel was not turning, or it turned differently for each photo. As a result, only two photos turned out ok, the rest are overexposed and blue, blurry, and overlapping. Any ideas why this is happening? Thanks

  97. lalouve
    lalouve ·

    Thank you! I never ever opened any camera before, but with your excellent explanation it was very easy to fix that problem. As I was dealing with that 'diana-sprockets-shredding-theme' in quite a rough way, I even found countless snippets of shredded sprockets in that part of the camera :D
    now everything seems to work much better than new :D

  98. gnarlyleech
    gnarlyleech ·

    Excellent!

  99. andreabashe
    andreabashe ·

    Hi there! I followed your repair instructions but the full frame/half frame inserts fell out and I'm not sure where to put them back. Can you please advise? Thank you!

  100. andreabashe
    andreabashe ·

    @edis You're a real one bro. COULD NOT have fixed the counter without you. Thank you so much

More Interesting Articles