Diana Mini First Impressions
11 28 Share TweetThis is my first impressions review of the Lomography Diana Mini White, bought for me as a present for my birthday in February 2011. A test roll was shot in Nottingham, England and processed the same day. Read on for my review and see what I made of this mini marvel.

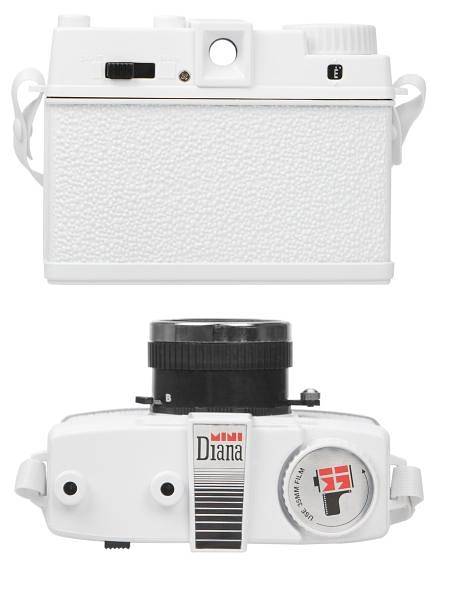
The Diana Mini is essentially a shrunken down 35mm version of the popular Diana F+ which supports both the classic Diana square format and half frame photos (up to 72 photos on a roll) and retains the same design and looks of its bigger sibling.
Being intrigued by the Mini and with a recent birthday I finally laid hands on the white variant of the Diana Mini thanks to my wonderful girlfriend.
After tearing away the gift-wrap I was left with a compact yet surprisingly weighty box containing my new camera. The overall presentation was really nice with the small but perfectly formed box displaying the Mini through a see-through top panel.
Further inspection of the box revealed a book in the base which I then realised contributed most of the weight to the packaging. The book itself is filled with photos in both square and half frame formats as well introducing the camera and concepts. It also gives plenty of tips and ideas to help you get to grips with the little Diana.
Putting the book to one side and removing the inner packaging I got my first feel of this little camera and initial reaction was good. Given its plastic construction I was pleasantly surprised that it did not feel too flimsy (unlike my other ‘Lomo’ camera – the Vivitar UWS) and the textured feel running around the body added to the quality feel. It also became apparent how pretty the Mini is up close especially in its white colour variant.
A quick glance around the camera revealed the focus ring on the front of the lens and the aperture and shutter speed settings nearby along with a thread for a shutter release cable. Settings appeared fairly straightforward too with two selectable shutter speeds (‘N’ for normal exposures and ‘B’ for long exposures), two apertures (sunny and cloudy) and four focal distances (0.6m, 1-2m, 2-4m and infinity). The shutter release also sits on the side of the lens.
On top of the camera is the film winder and two holes for the pronged Diana flash whilst underneath is a fairly standard film release button, rewind handle and release to slide the back of the camera off for loading/unloading film. Finally on the back there is the viewfinder and a switch to move between the two formats available but more about those later.
With the inspection compete and a good overall first impression it was time to actually use the camera. Loading my first film was straightforward and being careful to follow the instructions in the manual meant a successful first attempt. With film loaded I headed out around my local area for some test shots.
The weather being typically British and with limited control over aperture I opted for ASA400 speed film and set the aperture in most cases to the cloudy setting unless on the rare occasion the sun broke through the clouds. The shutter selection meanwhile stayed on the ‘N’ setting throughout. It’s worth mentioning though that if you’re a little careless you could accidentally put the camera in ‘B’ mode although I managed to avoid doing so.
Looking through the viewfinder to compose shots you can see opaque bars to the left and right which help frame the shot in half frame mode or ignored if shooting in the square format. With each shot composed in the viewfinder I pulled down on the shutter release and got a satisfying snap each time before winding the film on for the next shot. The camera itself felt good in my hands and most of the controls including the all important shutter release are in easy reach even for my sausage-like man fingers.
I did run into one small problem on the day concerning the focussing. As this is selected via rotating dial on the front of lens I found this a little tricky to change if I had the camera at eye level. The best solution was to change the focal distance before composing the shot in the viewfinder although I sometimes forgot to do this.
As the Diana Mini supports the half frame format too I felt it wouldn’t have been a proper test without giving this a go. It states in the manual that the format has to be changed before advancing the film and that it’s best to shoot a blank frame in-between for the benefit of the processing lab. It’s worth keeping this in mind. The process for me was to switch to half frame, advance the film (being careful to stop when I felt tension), shoot a frame with the lens cap on, advance the film again and shoot as normal. When changing back to the square format I shot another blank frame with the lens cap on too.
When the day ended I went off to my nearest 1 hour processing lab and asked that they i) process the film as normal ii) scan the negatives to CD so I can crop the borders off at home and iii) don’t cut the negative. With these instructions I had my photos back within the hour and without any complications.


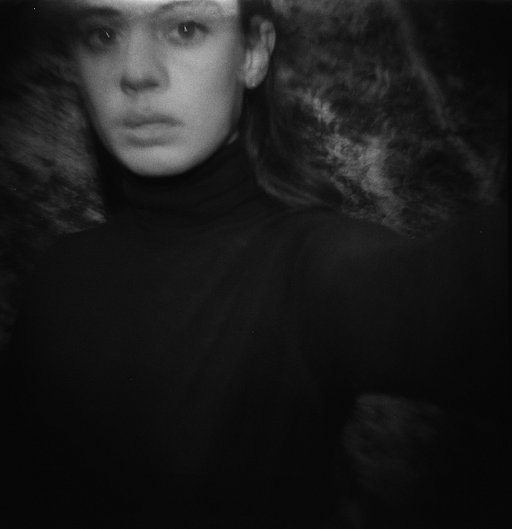
I have to say I was impressed with the Mini’s photos. Both the square and half frame formats looked great and save for a few focussing errors (possibly on my part) the aesthetic of the photos is exactly what I was expecting and perfectly in keeping with the ‘Lomo look’. The pairing of the Mini’s lens with a roll of Kodak Gold/Ultramax 400 returned some colourful, bright and saturated photos. Also any fears I had over camera shake when depressing the quite stiff shutter arm were dispelled as there was no sign of any. I shot some fairly uninspiring objects on the day and was pleasantly surprised when even these took on a character and certain quality.
If I had to pick faults I would say that focussing can be tricky on the fly and that you can get some waste through shooting blank frames between switching formats. Also if shooting continuously over the film you might have trouble getting the film processed at some labs.
Overall, although good value, I would find some benefit in the more expensive flash model but this is almost double the cost. In addition I can’t help feeling that although the included book is nicely presented and a good read I’m unlikely to pick it up again and wonder how much it adds to the overall cost of the package.
These are just minor gripes though and the Diana Mini definitely gets a thumbs up from me. For value, features, handling, build and more importantly the resulting photos I can’t complain. Even during this first test I haven’t yet tried double exposures or made use of the ‘B’ shutter setting so there’s plenty of experimenting left to do.
If you’re an experienced lomographer I would seriously consider adding the Mini to your collection. If on the other hand you’re new to Lomography then consider the Mini to be an ideal first camera. It has the benefits of the Diana F’s lovely square format and dreamy lens but with all the convenience of the 35mm film format.
written by veato on 2011-04-02 #gear #review #diana-mini #user-review #white-review-square-half-frame-35mm #request-posts


11 Comments