Tug Of War: Pushing and Pulling Film
13 31 Share TweetPushing film? Pulling film? Heard about it but not sure what it is? This small article may start you off in the right direction.

I must start this piece by telling you that I’m not an expert on pushing or pulling film, and to be honest I’ve not yet pulled film. But I have a decent idea of when to use the technique, gained through trial and error. So this isn’t intended as a complete guide to pushing and pulling; it’s more of a ‘this is what I messed with, see what you can do’.
So, what does it mean? Well, I’ll deal only with pushing film, so be aware that pulling is pretty much the same but in reverse. When I’m pushing film it means I’m developing longer than I’m supposed to. So, if the film is 400 ISO and it should be developed for 6:30 in Ilfosol, I’ll develop it for 13:30 instead. Why?
Well, say you’re in a poorly lit situation and you don’t have a flash. You’ve just got your Holga and some black and white film – in my case almost always Ilford HP5 Plus, which is rated at 400 ISO. You know it’s too dark to really capture everything properly but you shoot anyway, with the intention of pushing the film in development – you’re basically shooting as if you’ve got 800 ISO film in your camera.
This is because, when you push film (and in our case that just means developing for longer) the shadows on the negative get to spend more time developing, thus bringing out more detail. This means that although you have a mid-speed film you can still shoot in poor lighting, knowing that those details will be brought out by the extra development time (this also means that the highlights develop fully which often results in an image with a lot of contrast).
So, when would I personally use it? Well, for me the main reason I use it isn’t in dark conditions but in conditions where I feel a lot of contrast would benefit the final image. This is usually when the subject is in shade, or when the subject has a lot of detail against a fairly average background (like a dull grey sky).
I think the technique is particularly helpful if you live in the UK and like shooting black and white film with a Holga, as the light is nearly always poor (although it’s glorious sunshine as I write!) and pushing the film really helps get the most from your shot. The best advice I can give you is to just try it. Most film has a development chart on the box so just buy a roll of 400, shoot it in slightly less-than-perfect lighting conditions and then check the development times. Chances are it will tell you the development times for 800, 1200 etc. If it’s Ilford it almost definitely will and if not, just do a quick search online – the internet is your friend.
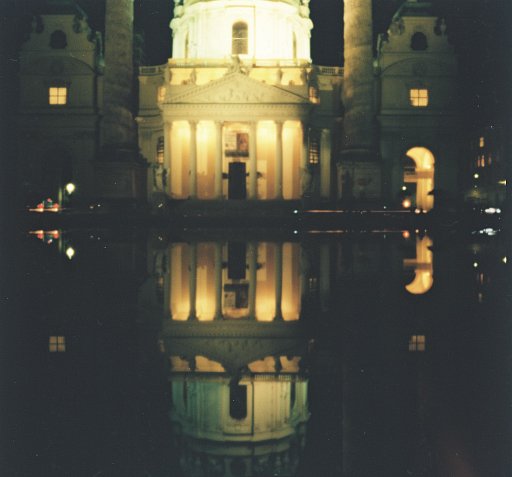
My first roll of pushed film was done without really knowing what I was doing and the top photo in this article is from that roll – super contrasty but in a good way! Oh by the way, this technique will also bring out more grain in your final image, which for me is another good reason to push the film. You can get a lot more advanced if you have a camera with adjustable ISO settings but this is the way I do it on a basic Holga – nice and simple.
And if it doesn’t quite work out… Oh well, that’s an excuse to go shoot another roll of film!
written by panchoballard on 2011-05-05 #gear #tutorials #black-and-white #developing #push #tipster #development #home-developing #holga #pushing #pulling #pull #film-processing


13 Comments