How to Process C41 at Home

45

After almost two years of nonstop shooting film and more than $1000 worth of expenses on processing and prints, I needed to reconsider my budget and find a way of being able to shoot more and pay less. And then I started to process my rolls at home. It is as easy as it could be and I‘ll show you today how to do it, step by step.

Today I am going to show you how easy it is to process your color films at home.

Credits: maxwellmaxen

Materials Needed

First off, this is what you‘ll need. After you get these first little expenses, processing at home is almost for free:

  • A film-developer tank (a lot of people trust Jobo Tanks, I got an AP because they are cheaper)
  • Scissors
  • A trash bag (or another bag in a nice size which doesn't have any dust in it)
  • The film you want to process
  • Measuring tools
  • A funnel
  • Tetanal C41 Rapid Kit (they come in liquid and powder form for 1 or 5 liters of working solution. I guess the liquid one is easier to work with but I don't know since I only used the liquid one)
  • Chemistry bottles (I have plastic ones but I‘d rather go for 500ml glass bottles because they are heavier)
  • A thermometer
  • An aquarium heater
  • A timer (I used my cellphone, every cellphone has a timer)
  • And a water tank where you can fit the three bottles and the development tank

Instructions:

Ok, first of all, you need to know that C41 is a normed process, this means that all films whichever ASA they are, take the same amount of time to process. This helps if you want to process two films at one go and they have different speeds. There are different ways to process C41, the standard is on 38°C, but this is too hot for me and pretty fast, there is the 45°C express process and the 30°C slower process. I will show you the 30°C way, because you can easily control this temperature, it is nice to handle and it is not too fast.

Second, the chemicals will weaken pretty fast, this means the more film you processed already in this solution, the more time it will take. But don‘t worry, each Tetanal pack has a manual in it with a nice chart and processing times.

Third, try to avoid useless air-contact with your chemicals. They will oxidate and turn bad faster if you leave bottles open and so on. You can slow this process down if you get yourself a Tetanal Protection Spray, which puts a film of gas (heavier than air, lighter than water) on top of your chemicals without affecting their ability to process.

Now, from the start.

Mix your chemicals. I use 500ml working solution, this means I can keep the 1-liter kit for twice as long. Mix them according to the manual in the package and pour each part (CD for Color Developer, BX for Bleach/Fix and Stab for Stabilisator) into one bottle, close it and label it accordingly. Put them into the Watertank. Also, put the thermometer and the aquarium heater into it and fill the tank with warm water. It is crucial that you keep control over the water‘s temperature because there is basically no tolerance in temperature for the process.

This will now have to wait a little while until all is at 30°C. After a few go's, you will almost know how warm it has to be and you will be able to pour in the almost exact temperature. You can speed up this process by adding hot water or adding cold water. But I for my part, like to just naturally heat up with the heater.

Load your film in the development tank. You take the scissors, the film and the tank, put them into the trash bag and the trash bag under your bed's blanket. I only use the trash bag because I can trust that there is no dust in it. You do not need it, but better be safe than sorry. As you know in this process, no light should get to the film. I won‘t explain the rest, since there are tons of tutorials on this out there. After you loaded up the film, put the tank into the water bath as well.

We skip the part where you wait to get the right temperature. This can vary between minutes and an hour, depending on how crazy-hot you poured in your water and we just started at processing.

You will have your manual at your side, so you will always be able to check how long you will have to use each part of the process.

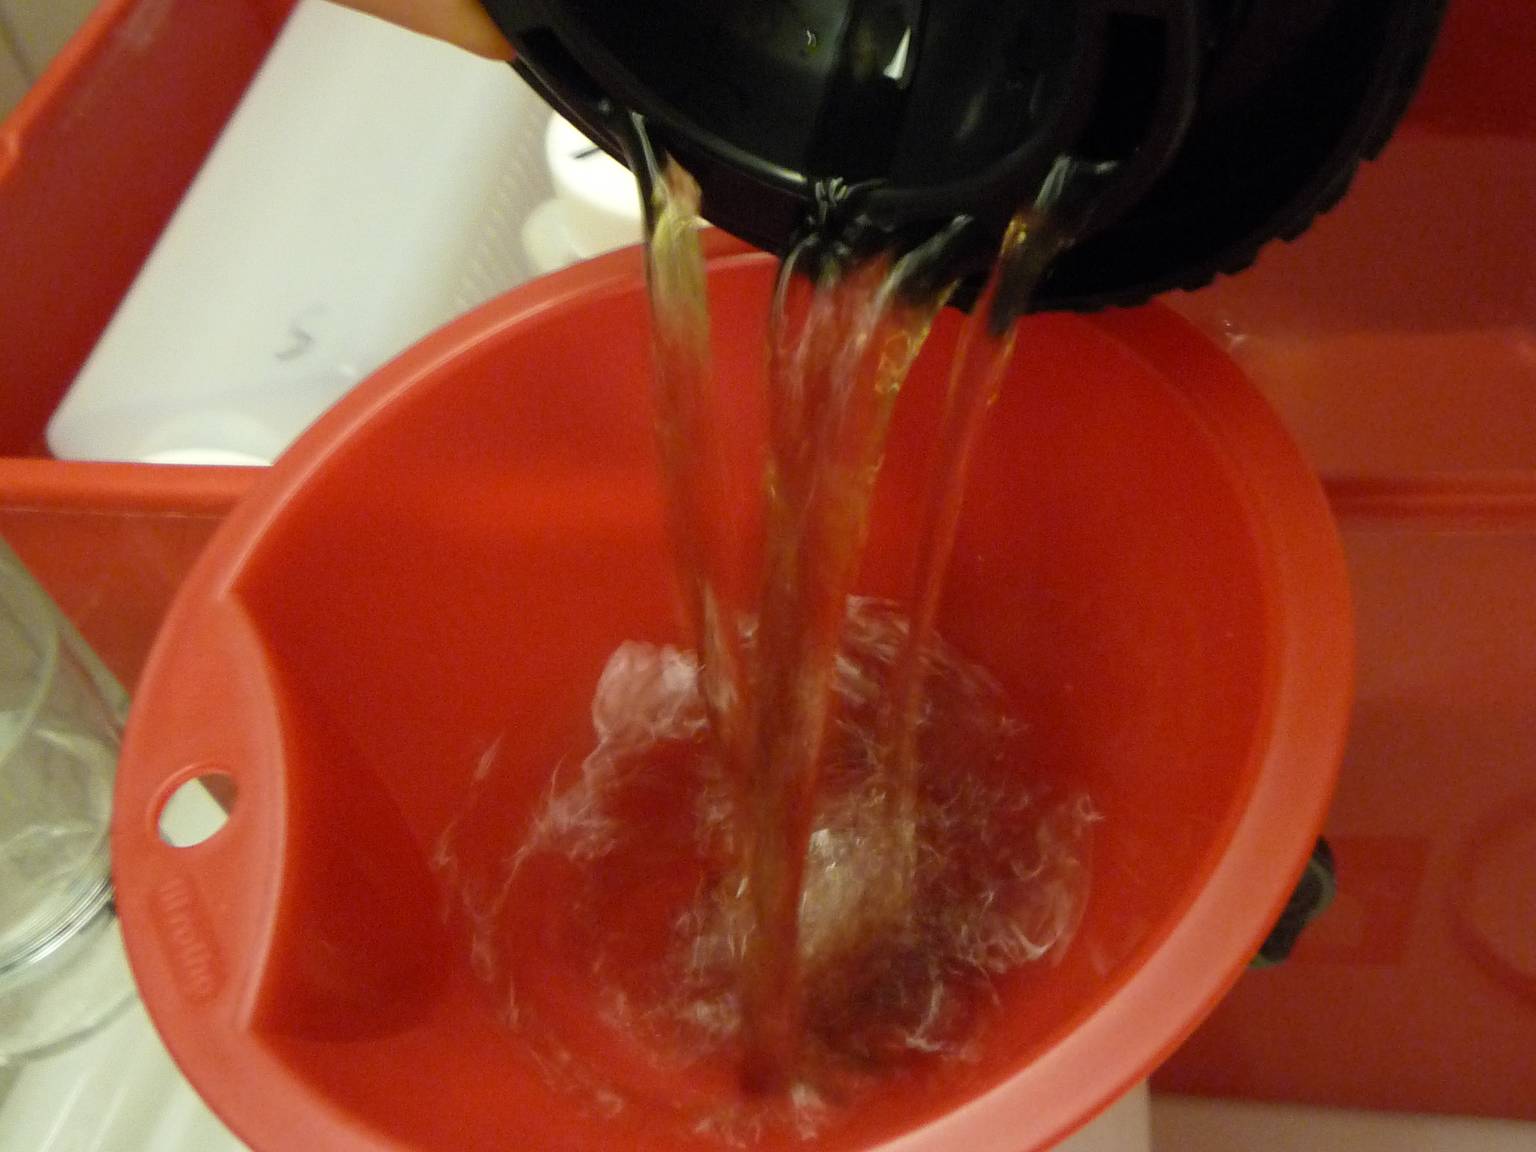
First off, pour the CD into your tank. The time starts when you start pouring it. Close the tank and put the funnel in the bottle. Put the tank back into the water bath and just move it around there gently. You can rotate it a bit as well. Do this the entire time. This will first help you use all the chemicals, not only the parts next to your film, but it will also help the water in the tank to flow around and keep the same temperature. Because your heater is of no use if you only heat up the still water around the heater and the rest cools off. About 10 seconds before time runs out, pour the CD back into its bottle, put the tank down, close the bottle, and put it back if you want to do a second film later or put it in storage.

Then pour in the BX and just do the same thing like before. When you put the BX back into its bottle, you‘ll need warm, running water. Rinse the film for about 6 minutes. I normally proceed this way. Fill the tank, inverse it 10 times, pour out the water and repeat. I normally do this 12 times, since it takes about 30 seconds each time. After this, it is already STAB time! No! No daggers, no knives. Sorry for that lame pun! Put the tank on a steady surface and pour in the stab. Just leave it like this for about a minute. STAB foams so much, I never move it because I think there would just be more foam. After this minute, put the STAB back and go rinse the film again.

Now you can open your tank and see. I now normally add some drops of wetting agent, but this is up to you. The booklet in the tetanal kit says nothing about a final rinse and some really hang the film to dry with the STAB foam still on it. I like it better with a wetting agent.

Open up the reel and take the start of your film (in the center) and use a clamp (I use the ones for laundry) and hang it to dry. I normally hang two more at the bottom end to straighten the film.

Now you can wash out all your processing stuff and really, really dry it. You do not want any calcium residue (due to hard water) in your tank, this could falsify the results for next time. If you want, you can blow-dry your negatives or just let them sit there for about two hours. After that, cut them, put them in sleeves and press them for a few hours (for best results) but you can also just go ahead and scan them.

I know, this method is not the cleanest, not the most professional, but it turned out to suit my needs the best. What I found out after a while, you will need a lotion for your hands later, because the water dehydrates your skin so much. I started to wear rubber gloves, which keeps the moisture in your skin.

I hope I could help some of you or at least help you to decide, whether you want to take the next step or not yet. All in all, it is a great way to save money and to learn something about your film. And of course, it is a great excuse to spend a lot more time with photography.

If you have anything to add or have questions, please do this in the comments, I‘ll try to help any of you!

Big thanks to ck_berlin for helping me with my concerns a while back. For another way to process, check this great Flickr tutorial.

And here are some examples of my home-processed films:

Credits: maxwellmaxen

One last little addition: I ended up doing about 12 rolls of film per 500ml solution. This almost doubles what is written in the booklet. So you do about 25 rolls with 1 liter of solution instead of 16.


This tutorial was written by maxwellmaxen. Upload your own home-processed exposures using this tipster to your LomoHome and share the analogue love!

written by maxwellmaxen on 2012-04-02 #gear #tutorials #diy #c41 #tutorial #tipster #development #xpro #select-type-of-tipster #select-what-this-tipster-is-about #home-process #film-processing #tetanal

45 Comments

  1. emilios
    emilios ·

    Bravo, Very detailed.

  2. iloveyousummer
    iloveyousummer ·

    Two thumbs up for you man and keep up the good work.

  3. lakandula
    lakandula ·

    Kudos for your hardwork! Thanks for sharing.

  4. maxwellmaxen
    maxwellmaxen ·

    @emilios thank you! i tried to make it as easy as possible, i know i was thankful for a detailed tutorial.
    @iloveyousummer thank you! i will try to do more good!
    @lakandula thank you! i guess when i figure it out, others are thankful for me sharing my experience. as long as it helps to not scare people from hand-processing :)

    thank you all! your feedback is so great! you're the best!

  5. emilios
    emilios ·

    @maxwellmaxen: I agree with you on the 30°C but u can still get some kick ass results on 45 and 38. I personally prefer 37-38. If u havent tried it yet then u should!

  6. cutebun
    cutebun ·

    Awesome!

  7. guanatos
    guanatos ·

    this is awesome!!! I'm sooo thinking about developing at home!
    have you crossed processed also? or just color negatives?

  8. maxwellmaxen
    maxwellmaxen ·

    @emilios because the process is normed you will likely get the same results with higher temps and less time, but 30° just works perfectly for me. you wont need to hurry!
    @cutebun thank you!
    @guanatos thanks! just do it at home, it is as simple as it gets. xpro is just as easy. just process it like a cn film. i have done it with different speeds and different formats, it all turns out great. you might check out my pictures the latest 15 or so albums are home processed :)

  9. guanatos
    guanatos ·

    @maxwellmaxen sweet!!!! I'll have to start saving to gear up, but you're soooo right, it's way cheaper. Thanks for a great article and keep us posted on this man :)

  10. angie_lemon
    angie_lemon ·

    Brilliant - haven't done this since college and never at home - am definitely going to give it a try!

  11. maxwellmaxen
    maxwellmaxen ·

    @guanatos do it! i love it! you can leave some stuff away, for example can you try to store the chemicals in soda bottles, but yeah, you can never know if somebody decides to drink that stuff... you could also leave the heater away, but i like it like this, better safe than sorry
    @angie_lemon oh wow, did i just convince someone to do stuff who didnt consider doing it? :)

  12. sethisto
    sethisto ·

    Pics are stunning, but dear lawdy does this ever look time and money consuming!

  13. maxwellmaxen
    maxwellmaxen ·

    @sethisto thank you! uhm, like a lot of things the first buy does cost a little, after that it is absolutely cheap. the chemistry bottles cost about 2€ a piece, but you can use them for ever. measuring stuff sums up at about 8€ (2 500ml and 1 25ml), the AP tank cost 15€, the aquarium heater was around 30€, funnel and water tank are pretty cheap. the tetanal 1liter kit cost 15 € as well. all in all i got my gear for something under 70€ and i am still in the first liter of chemicals and i have to say i already saved like 15€, but the second 500ml of my working solution is still fine for about 10 films.
    process takes from 15 minutes to about an hour, depending on how fresh your chemicals are. but you can actually do stuff while processing, i often watch movies or read, as long as you can keep an eye on the timer, or you just set alarms/countdowns :)

  14. ehsanaiman
    ehsanaiman ·

    maybe i will try it.hehehe

  15. simonh82
    simonh82 ·

    Good article, thanks for sharing. Just to say that you should definitely use gloves if you are going anywhere near the stab. It seems like the most innocuous stuff, but it contains a really nasty chemical called formalin which is carcinogenic.

  16. kaimcn
    kaimcn ·

    Excellent lesson! I'm looking to get into developing my own film but don't have a scanner or the space to print photos. Still, processing is a skill I'd love to have under my belt!

  17. maxwellmaxen
    maxwellmaxen ·

    @ehsanaiman do it! it is super fun!
    @simonh82 thank you! i did not know this about the stab! this is shocking! but actually i never had contact with stab, but maybe i was just lucky? so use rubber gloves!
    @kaimcn well, i am lucky to have gotten a good scanner pretty early, but they go pretty cheap off ebay, why not try it second-hand?

  18. lighthouseblues
    lighthouseblues ·

    Very very good artice, THANKS a lot!!! You know, I recently bought a diy kit from Tetenal, then I got scared and put it on a kitchen counter, and every day we stare at eathother... ;-)))
    But I have searched a lot for the info you just gave, that it is the same time regardless of which film or ISO it is. So now I dont have any excuses left... ;-)) Just do it!!!
    THANKS!!!!!

  19. maxwellmaxen
    maxwellmaxen ·

    @lighthouseblues i am glad i could help you! i just ordered my second kit :) it really is easy and the time chart is in the manual you have in the kit.
    i also never had problems with xpro, i simpy used the same time.

  20. sirio174
    sirio174 ·

    another great product is Nova Prospeeed C41 with only two baths: developing and blix. More simple, more fast!

  21. maxwellmaxen
    maxwellmaxen ·

    @sirio174 this is a great tip, thank you! actually, what i heard is, you don't really need stab, because the blix is a fix, you don't need stab for b/w. BUT, color is affected heavier by age. so i guess adding stab adds years to your negatives ;)

  22. davidstafford
    davidstafford ·

    Used to do this back at school, would love to try again at home just not enough room to store the chemicals or create a darkroom. Maybe in the future :)

  23. kneehigh85
    kneehigh85 ·

    I have had a go at B&W but was too scared to try C41 because everyone says it is too hard. Problem is I don't really shoot much B&W and the stuff I use is C41 anyway. This is a brilliant tutorial and I am going to convince some friends to do it too! Thanks x

  24. freelancer
    freelancer ·

    Excellent tutorial!! Kudos! But where do you get the tetenal for 15€?

  25. maxwellmaxen
    maxwellmaxen ·

    @davidstafford all the storage room it needs is about 50x50cm. you won't need a darkroom either. i have a very small room, where i live and i can really keep it somewhere :) you just need darkness for loading the film into the tank, but you could get a changing-bag or do it, as i suggest, under your blanket. i do the rest with full light, because the tank is lightproof :)
    @kneehigh85 it is really as simple as bw, i think even simpler, because the processing times are fixed. so you wont need to calculate and so on. i do bw as well, and i am more secure at c41, i guess basically because i do it like 10 times more often. you can really take my tutorial and maybe consider the one on flickr i posted a link to as well, and you are good to go!
    @freelancer vielen dank! ich bestelle immer bei www.fotoimpex.de :) super service, allgemein günstigste preise und enorm schnelle lieferung (wobei das halt von dhl abhängt) aber 3 arbeitstage in die schweiz ist ziemlich schnell :)

  26. davidstafford
    davidstafford ·

    found this on the web, looks like a good price too: www.firstcall-photographic.co.uk/products/616/tetenal-color…

  27. davidstafford
    davidstafford ·

    @maxwellmaxen SOLD! going to put my order in for the stuff next payday! love the thought of being able to process at home! Thanks for the great easy and simple to read guide!

  28. maxwellmaxen
    maxwellmaxen ·

    @davidstafford glad to be able to help you! this is the exact kit i have and the price is good! good luck and let me know about your results!

  29. karo_mini
    karo_mini ·

    wow! great article ;) i just got the chemicals and i prepare to process my first B&W films so i really really found your tipster a great help! so after the 1st trial with B&W i might try C41 too! :) thanks!!! :)

  30. maxwellmaxen
    maxwellmaxen ·

    @karo_mini thank you! good luck with the b/w! if you can handle those you are for sure ready to do c41. if you try it, let me know your results!

  31. karo_mini
    karo_mini ·

    @maxwellmaxen thanks for encouragement. Im waiting for equipment as i got to know a husband of my cousine used to develop films ages ago so I plan to learn and he really looks forward to refreshing his old hobby! ill let you know for sure how it went!

  32. juliaines
    juliaines ·

    Thank you maxwellmaxen for posting this guide. It seems like a lot of fun without going broke. I'm buying my "equipment" right now and I have a few questions.
    -Can I use transparent bottles for the chemicals? I found a good deal but I'm not sure. The lids are anti leak.
    -What's better? A plastic reel or a metallic one. This sounds silly but I wanna get a "friendly" tank/reel.
    -Can I develop infrared film with this process?
    Thank you :)

  33. maxwellmaxen
    maxwellmaxen ·

    @karo_mini haha teaming up is great! you are from poland, right? if you understand german I can link you up with the greatest black and white tutorial of all times, but only if you want. this helped me a lot to understand... but maybe it would only confuse you.. it sure would if someone sent me a french tutorial :)

    hey there @juliaines thanks for you questions, i now feel "needed" ;) i myself have transparent bottles. if they are chemical bottles, they should somehow be anti-leak, but i don't really know anything about this. i just bought the cheapest :D
    I have only plastic-reels. they have a very simple mechanism to take the film out of the spool and transport it onto the reel (two little balls that can move). i saw metallic reels once and it seemed not too trustworthy, but again, i only used the plastic ones (if you process black and white, there will be trace-residue of silver on the reel. this does color the plastic a little but not affect anything at all)
    when using plastic reels and you just process a few films in a row, make sure you really dry the reels before loading a new film, i just had a really bitter fight with a film and was near ruining it, because the unprocessed emulsion at the sprockets got sticky and bitchy when wet.
    you can process color infra red. or better: color infra red is actual e6. but you can cross process it, so yes, you can process color infra red and it will look rad.
    the black and white infrared (i only know the efke ir 820) are standard B/W process.
    i hope i could help you, if not or if you have anymore questions, just hit me up, i'm glad to help!

  34. lighthouseblues
    lighthouseblues ·

    So!
    Finally I have done it!!!! I'm so proud..... ;-)

    Thanks to you all and of course specially to you @maxwellmaxen for this great tutorial, this really gave me the inspiration and courage to finally take the step!

    I have through the years developed more than 150 rolls of bw film at home, but to take the step on to develop color film for me has been an almost gigantic step, I do not really know why, I know, it's really really silly, but now at least I made ​​it!
    I have not been able to evaluate the results yet, the film hangs at the moment up to dry, but it looked okay, it was certainly a distinct difference between the exposed frames and film base.

    So far so good!! :-D

    Thanks again and wish me luck with the scanning.... ;-)

  35. maxwellmaxen
    maxwellmaxen ·

    @lighthouseblues i am glad you have a good feeling about it! i really like, when i can help people!

  36. lighthouseblues
    lighthouseblues ·

    Now I have published an album with the results! Thanks a lot @maxwellmaxen for great great great inspiration!! I'm really satisfied with the result, and I'm sure gonna do it again! :-)
    Please have a look ant tell me what you think. www.lomography.com/homes/lighthouseblues/albums/1843221-diy…

  37. maxwellmaxen
    maxwellmaxen ·

    @lighhouseblues well your results speak for themselves! it is so great that you dared to do it! good luck with further films in the future!

  38. laluenbaires
    laluenbaires ·

    First of all, I'm new to this. The reason I fell in love with lomography is because I love the colors of the pictures using cross-process. But since it's really expensive to develop film with that process where I live, I chose a La Sardina camera and regular 35 film. With this DIY tip, can you also process slide film?

  39. maxwellmaxen
    maxwellmaxen ·

    @laluenbaires hi! slide film has a standard process called E6, but this makes it into diapositive film, the ones you might know from way back in the slides.
    when you process slide film with C41, you do cross process the film, have all the funny colors and all.
    sample picture 8-10 and 15-21 are cross processed slide films :)

  40. laluenbaires
    laluenbaires ·

    awesome then! worth doing!

  41. samsayshi
    samsayshi ·

    im just wonder because im not sure, but which bits do you have to do in complete darkness and when is it safe to have a light on

  42. maxwellmaxen
    maxwellmaxen ·

    @samsayshi hey, good question. what has to be in complete darkness: getting the film onto the reel and inside the tank. when you have to take the film out of the tank, this has to be in total darkness as well, well because exposure, you know ;) everything where the film still can be exposed has to be in complete darkness.
    as soon as you closed the development tank, you can operate in bright daylight :)

  43. iamtheju
    iamtheju ·

    I processed loads of B&W film with a really similar process when I studied photography at school so I am looking forward to getting back into it with colour film.
    This article has really inspired me to get the stuff and get developing. I need to save some processing money also.

  44. linniec
    linniec ·

    Hi maxwellmaxen, I've been searching online and around Pretoria South Africa for stores that sell the Tetanal C41 Rappid kit and can't seem to find any. I have phoned my pro photographic stores and asked everywhere I can possibly think of and the only chemical developer I can find are the ones I use at my college for black and white developing only. Oky so its becomming extremely frustrating for photographers in South Africa to do film photography because we can basically buy the film anywhere but no one develops it anymore, except for one place in Johannesburg which is too far for me to travel all the time so I thought of developing my own color film... but I cannot buy the Tetanal C41 solution. Is there any online store you can recomend that sells the solution and that will deliver to South Africa?

  45. nural
    nural ·

    Do you ever get water marks on your films? I use the same kit and lately I started getting these marks because the film doesn't dry properly... Do you think the wetting agent would solve this issue?

More Interesting Articles