DIY Tutorial to Shoot 35 mm on 120 Spools by FilmHAX
4 38 Share TweetHey Lomographers, ever want to switch up your shooting style? We got a one on one with photographer David of FilmHAX to show you how to mix up your film formats. So here we go!

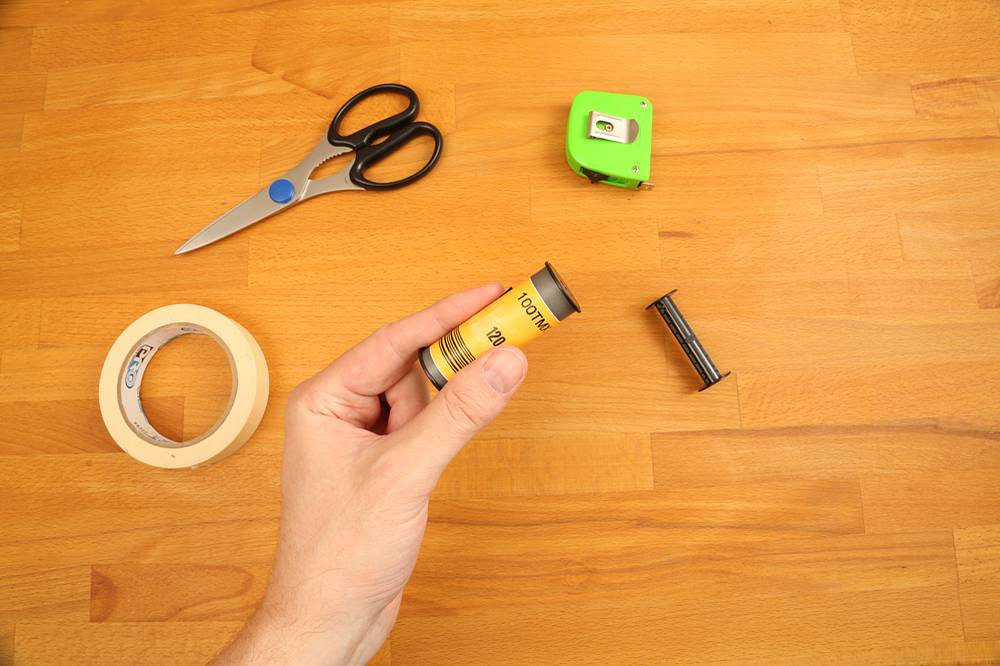
Materials: Everything You’ll Need
- 1 Roll of film
- 2 x 120 spools
- 1 backing paper from a roll of 120
- scissors
- masking tape
- tape measure
- dark bag or dark space (not shown)

Step 1
Unroll the backing paper until you reach a piece of tape. This is where the original 120 film was taped down and it is our starting place.

Step 2
Tape the leader of 35 mm film at some point along this line:
a.) Taping near the top or bottom edge makes framing through the viewfinder makes it less of a guessing game.
b.) But I like to tape my rolls near the middle, it minimizes vignetting and insulates from a light leak around the edges of the roll.

Step 3
Make sure that you either cut off the skinny part of the leader or tape it all down. This is the leading edge of the roll going into your camera, so you don’t want it to snag or pull the film from the backing.

Step 4
You only need to do this the first time! Before you start rolling, you’ll want to put down a marker where your negative will end (and where you will make your cut). Measure 82.5cm from the starting place (in Step 2) and mark it with a piece of tape.
Note: The last 3cm of the film is never exposed but used by your camera to keep tension across the film.

Step 5
Take the empty spool and start rolling the leader onto it until you reach the starting point (in Step 2), and your 35 mm cassette.


Step 6
Put your film and scissors into the dark bag. (Glove is optional)

Step 7: In the Darkroom - The Fun Part!
Roll the 120 spools towards the 35 mm cassette, pulling more film from the cassette as you go along. Stop and cut when you feel that piece of tape from Step 5.

Step 8: In the Darkroom - The Tricky Part
Take the spool on the right (the smaller side) and roll it over the loose end of the film that you just cut.

Step 9: In the Darkroom - Rolling
Keep Rolling! Roll the right side to the left until the other spool falls off.

Step 10: Done!
I like to wrap my rolls with an elastic before packing them into my bag.

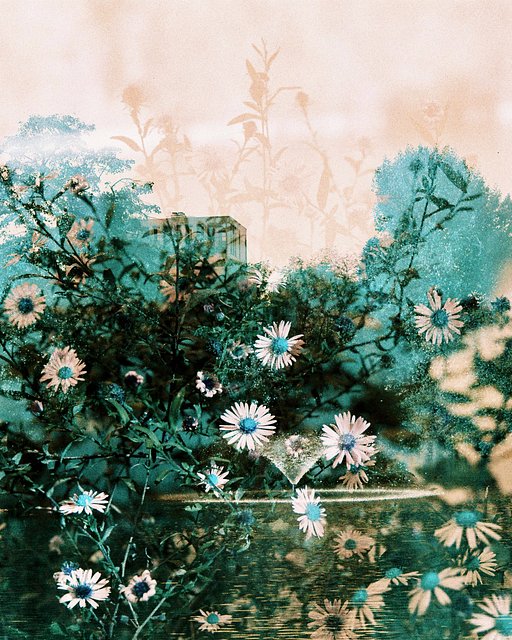
Step 11: Enjoy the results!


Now, get to know David from FilmHAX, who provided this lovely tutorial through this interview:
How long have you been a photographer?
Professionally for the last 3 years although I've been shooting since I was a teen.
Do you like experimenting with different formats of films and mixing them with different cameras?
It has been a pretty recent obsession of mine, putting 35 mm film into medium format cameras. Whenever I hit a wall, I usually try a DIY project to spark my creativity.
Film size was the biggest challenge for this DIY - it's the most rigid element when you think about a film camera. It's where the designer or industrial engineer started the whole process, and probably never intended it to be used differently.
Do you do a lot of DIY photography projects, if so, please explain?
My projects are the byproduct of learning. I love to tear things apart to figure out how things work and if I'm lucky, put them back together again. Usually, I learn something in the process and start thinking about new ways to use that information- it gets geeky pretty quickly! It's always satisfying though.
What do you like shooting the most and what would you like to shoot?
I love photographing people, usually strangers on the street here in New York. It's tough finding a good picture in a constantly changing environment - it teaches you a lot about reading light and anticipating an image. I post my street photography on Instagram.
That said, I'd love to shoot more environmental portraits and meet more people in the places where they live and work. I think that would be satisfying - trying to inject a feeling into an image that reflects a subject’s attitude toward that place.
Do you have a favorite camera or film type?
The simpler the better - I have a 60-year-old Leica m3 that goes almost everywhere with me, and usually loaded with a slow BW or color film.
Do you have more tutorials and how did you figure out how to do this with your camera?
I’ve recently started posting walkthroughs of my DIY projects on Instagram as FilmHAX - the most recent walkthrough is about DX coding bulk-loaded film canisters. I launched the account as a place to send people that asked me how I was creating my images.
I had my eureka moment while shooting a Fuji GW690III. I quickly realized that if I could figure out a way to run 35 mm film through it, I would have a wider negative than most panoramic rangefinders at a fraction of the price. For it to be practical I needed to be able to take the film out of the camera in daylight, which other popular solutions didn’t allow for.
Don't forget to upload your shots using this tutorial to your LomoHome!
written by mike_mytnick on 2015-09-14 #gear #tutorials #lifestyle #diy #medium-format #35mm #tutorial #tipster


4 Comments